SonarQube is one of the various tools that can help in writing cleaner and safer software. The advantages of having SonarQube integrated with Bitbucket can be enormous. One of the many benefits is the possibility to agree to a set of coding standards and best practices and have an automated tool checking for violations of those rules and best practices. Also very helpful is the possibility to see these violations directly in the Pull Requests. This makes it easy to spot duplicated code, dead code, code smells, security vulnerabilities, and countless other helpful tips depending on the programming language of the project.
In this blog post, I will cover the following topics:
- how to install SonarQube
- how to set up a SonarQube project
- how to create and manage Quality Profiles and Rulesets
- and finally, how to integrate everything with Bitbucket Pull Requests with inline reporting for violations
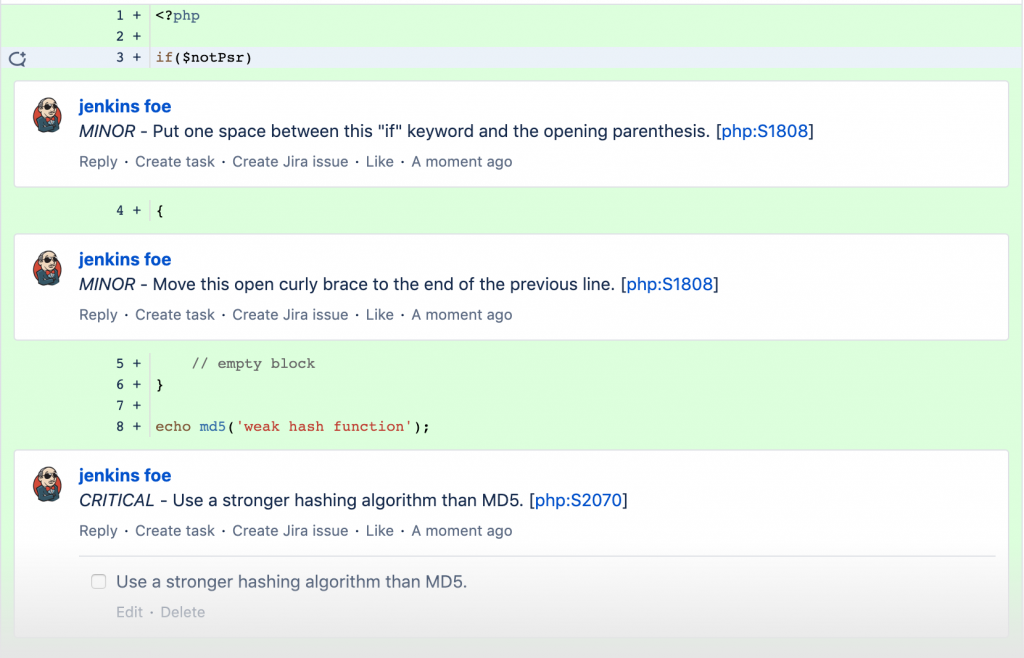
In the end, the outcome should look similar to this:
So let’s get started!
Requirements
This is a list of required tools that are needed to follow the examples in this blog post but not all are necessary to understand the technical concepts of this blog post.
- Docker
- To easily run a SonarQube instance. Using already installed SonarQube instance is possible.
- SonarQube Community <= 7.6
- Using the community open-source plugin for Bitbucket integration is only possible with SonarQube versions <= 7.6. For newer versions, it is possible to achieve the same results but only with the paid Developer version of SonarQube (this setup is not covered in this blog post but left for some other future post).
- SonarQube Bitbucket plugin (https://github.com/AmadeusITGroup/sonar-stash)
- This is an open-source community plugin that allows SonarQube to be a real reviewer, run scans and publish comments with inline violations directly into the Bitbucket Pull Requests.
- Bitbucket
- Access to a Bitbucket repository with permission to create Pull Requests to be able to test the integration with SonarQube.
- Programming language supported by SonarQube
- For the examples of this blog post, PHP will be used.
SonarQube Setup
Setting up SonarQube
First, let’s install and run SonarQube 7.6 using Docker:
docker run -d --name sonarqube -p 9000:9000 sonarqube:7.6-community
This should download and run the SonarQube image on port 9000 and by running docker ps you should be able to see a result similar to this:
CONTAINER ID        IMAGE                     COMMAND           PORTS                    NAMES
48c611abd123        sonarqube:7.6-community   "./bin/run.sh"    0.0.0.0:9000->9000/tcp   sonarqube
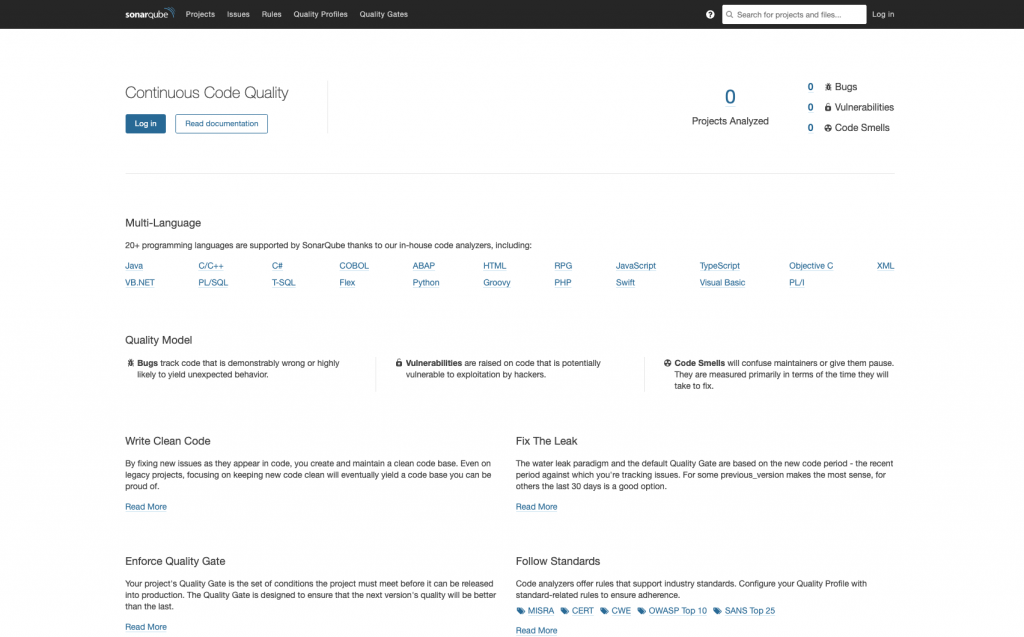
Next, by navigating to http://localhost:9000 you should be able to see the home page of SonarQube! You can use the default admin:admin credentials to login to the instance. With this, you have validated that the SonarQube instance was installed properly and you can continue with the next step!
Installing Bitbucket Plugin
To install the community Bitbucket plugin download the newest file (.jar) version from https://github.com/AmadeusITGroup/sonar-stash/releases to your desired location. Next, copy the plugin to the SonarQube plugin directory using the following docker command:
docker cp sonar-stash-plugin-1.6.0.jar sonarqube:/opt/sonarqube/extensions/plugins/
To activate the new plugin restart the server by going to Administration -> System (http://localhost:9000/admin/system) and clicking the Restart Server button in the top right part of the page. This process usually takes a few minutes but as soon as it is complete the new plugin should be active. To validate this, go to Administration -> Marketplace (http://localhost:9000/admin/marketplace?filter=installed) and search for “stash”. You should be able to see the plugin in the list.

The configuration for this plugin is located in the Administration -> Configuration -> General Settings -> Stash (http://localhost:9000/admin/settings?category=stash) which we will look into in more detail a bit later. With this, we wrap up the plugin installation and can continue with the next steps.
Project Setup
So far, we prepared a working SonarQube instance with an installed Bitbucket plugin. Next step is to set up a test project and run the first analysis. To create a new test project go to Projects (http://localhost:9000/projects) and click the “Create new project” button. On the create new project form add project key and display name e.g. Project key: test and Display name: Test Project. On the next page add a name for the token e.g. “Test Token” and select the language for the project and operating system e.g. PHP – macOS. Information about how to download and install the SonarQube scanner will be presented. On the next step, we will run the first analysis on the project.
The First Analysis
To get familiar with how SonarQube analysis works lets run analysis on a test project and examine the results. To do this first we need a test project that we can use! For this blog post, I will use the code from one of the most famous open-source PHP frameworks called Laravel (https://github.com/laravel/framework). Any other piece of code can be used as well, though the analysis results will be quite different. To run the first analysis execute the following commands:
// Get the test code
git clone https://github.com/laravel/framework.git laravel
cd laravel

// Run the sonar scanner
sonar-scanner \
    -Dsonar.projectKey=test \
    -Dsonar.sources=. \
    -Dsonar.host.url=http://localhost:9000 \
    -Dsonar.login=YourTokenHere
After the analysis is complete which can take a few minutes, in the Projects tab there will be analysis information about the project. Looking closely at the results specifically the bugs, vulnerabilities, code duplications and code smells it possible to see that some rules are more important than others depending on the project and team priority. To refine these rules to the project it is possible to create a custom Quality Profile which can be customised to the needs of the project which I will show how to do in the next step.

Customising the Quality Profile
First, let’s navigate to the Quality Profiles tab (http://localhost:9000/profiles) to see all default Quality Profiles defined by SonarQube. Here it is possible to see all the rules active for that Quality Profile and on which projects this Quality Profile is used.
To create a new Quality Profile click the “Create” button on the top right and add the following:
- Specify the name e.g. “Laravel”
- The language for which you want to create a new Quality Profile
- Parent Quality Profile to inherit rules from, leave it empty. It is not possible to disable inherited rules!
Next, let’s activate some rules so we can use the Quality Profile! Select the Quality Profile (http://localhost:9000/profiles/show?language=php&name=Laravel) and click the button “Activate More” on the left side. Import the rules that are active in the “PSR-2” and “Sonar Way” Quality Profiles by doing the following:
- Filter by Quality Profile on the left to “PSR-2” and clicking the active label
- Click “Bulk Change” -> “Activate In”
- Select the name of your Quality Profile in this case, “Laravel” and then click “Apply”
- Repeat the same steps for the “Sonar Way” Quality Profile
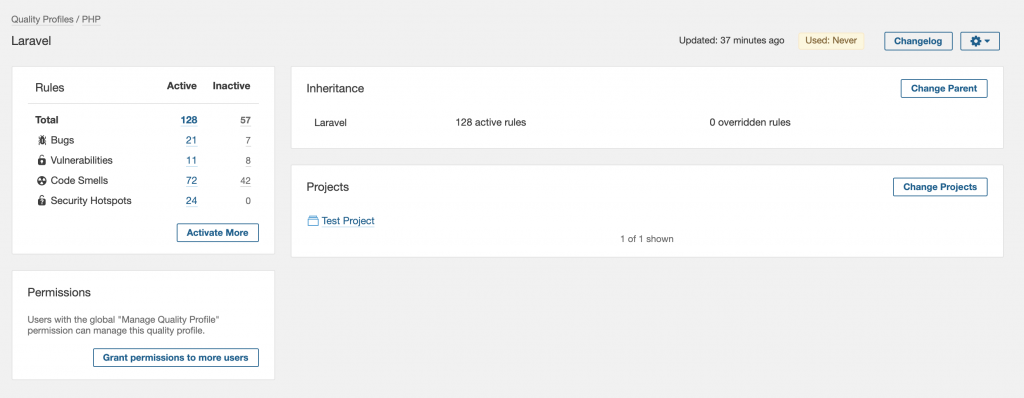
With this, we have imported all active rules active in both Quality Gates as a base to the “Laravel” Quality Profile. Next, let’s refine the active rules depending on the needs of the project.
One way to refine them is to check the most impactful rules for the Project. To do this go to Projects -> Test Project -> Issues and select the “Rule” filter which will show all different rules grouped by the number of violations. For the “Test Project”, the rule “String literals should not be duplicated” has more than 2.3k violations. That is more than 65% of all Code Smell violations. If you consider this rule unnecessary, then you can disable it or change the threshold to a higher number. You can do this easily by finding the rule in the Rules tab. Repeating the same process for all most impactful rules is necessary to refine the Quality Profile.
Note: I would recommend discussing these rules in the team and changing them accordingly to your coding standards. This way you will end up with clean ruleset that makes the most sense for the project.

The only thing missing now is setting the “Laravel” Quality Profile as a default for the “Test Project”. You can do this by clicking on the “Change Projects” button in the Quality Profile overview. Then search for the Test Project and select it from the list. With this, every next analysis on the “Test Project” will be using the “Laravel” Quality Profile by default. Let’s proceed with one more test analysis with the changed Quality Profile. For the “Test Project”, I disabled the “String literals should not be duplicated” rule as a test to see if the “Laravel” Quality Profile is working. After running the sonar scanner command one more time and waiting for the analysis to be processed, we can notice that the Code Smells violations have dropped significantly because of our changes to the Quality Profile.

Let the Commenting Begin
Now that you have set up your own Project and Quality Profile you are ready to connect it with Bitbucket. You can do this in a few simple steps:
- Setup a Bitbucket repository
- Configure the Bitbucket SonarQube plugin
- Create a Pull Request
- Run the sonar scanner
Let’s go through them one by one.
Setup a Bitbucket repository
For this step, you will need to create a Bitbucket repository and push the code related to the “Test Project” to that repository. I created a new Bitbucket repository and pushed the “Laravel” code to that repository.
Configure the Bitbucket SonarQube plugin
To configure the Bitbucket SonarQube plugin server go to Administration -> Configuration -> General Settings -> Stash (http://localhost:9000/admin/settings?category=stash) and configure the following:
- Stash base URL – add the URL to your Bitbucket server
- Stash base User – set to the user you would like to comment on the Bitbucket Pull Requests
- Include Files in Overview – set to true to get more information on the overview comment
- Stash tasks severity threshold – set to desired severity e.g. Major, this will create tasks for violations that are higher or equal to Major which will prevent merging of the Pull Request
Create a Pull Request
Now, let’s pretend to be a lazy developer and create a Pull Request with a lot of code smell violations and see if SonarQube will catch us! Let’s commit the following file catchmeifyoucan.php to a new branch testing-sonarqube and create a Pull Request.
<?php

if($notPsr)
{
    // empty block
}

echo md5('weak hash function');

// coffee break!
sleep(1);

function Very_Bad_Name() {
    throw Exception('Too generic');
}

// Why?
die;
Run the sonar scanner
Now that you have the Bitbucket plugin configured and a new Pull Request from the lazy dev, you can run the analysis and examine the results. To run the sonar scanner on the Pull Request use the following command:
sonar-scanner \
    -Dsonar.projectKey=test \
    -Dsonar.sources=. \
    -Dsonar.host.url=http://localhost:9000 \
    -Dsonar.login=YourTokenHere \
    -Dsonar.branch=testing-sonarqube \
    -Dsonar.sourceEncoding=UTF-8 \
    -Dsonar.analysis.mode=preview \
    -Dsonar.inclusions=catchmeifyoucan.php \
    -Dsonar.stash.notification=true \
    -Dsonar.stash.project=YourProjectNameHere \
    -Dsonar.stash.repository=YourRepositoryNameHere \
    -Dsonar.stash.comments.reset \
    -Dsonar.stash.pullrequest.id=YourPullRequestIdHere \
    -Dsonar.stash.password=YourAccountPasswordHere
Note: Usual Bitbucket Pull Request URL will contain most of this information:
https://example.com/projects/ {YourProjectName} /repos/ {YourRepositoryName} /pull-requests/ {YourPullRequestId} /overview
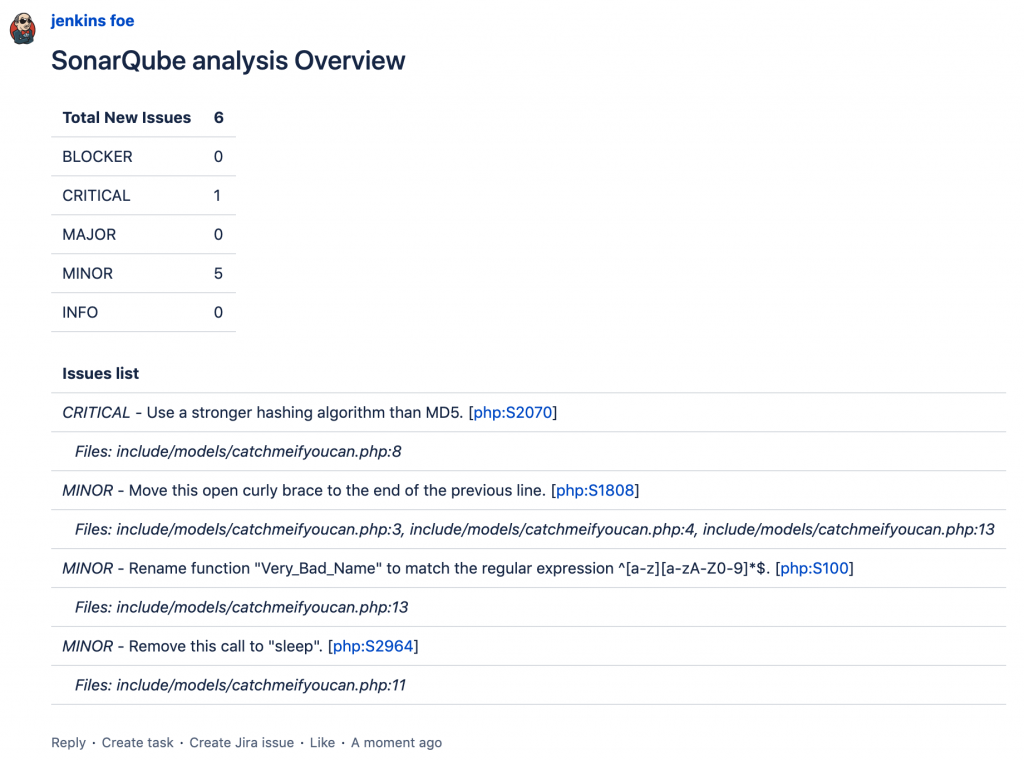
After a few minutes, you should be able to see the overall comment in the overview section and the inline comments in the diff view of the Pull Request. In the overall comment, you will be able to see all violations for all files that are affected by any change of the Pull Request. The inline comments are only visible for the changes shown in the diff view of the Pull request.

Finally, we have connected all the steps and made SonarQube a real reviewer! An additional step you can easily do is to attach the sonar scanner command to a CI system that runs it automatically. This way, you can run it after each Pull Request creation or after a new commit is pushed. With this, you will have a real automated code reviewer that is tireless and fierce in search of any code violation.
Summary
SonarQube is a great tool used to improve code quality and integrating it with Bitbucket Pull Request makes it a real code reviewer. It gives more time for the reviewer to look into the important technical and architectural approaches while ignoring the boring coding standard violations. By using SonarQube over a longer period it is possible to track the code quality over that period. This allows getting an overall feeling of the direction of code quality which gives more insights into the state of the Project quality in general. Having this data makes it easier to arrive at informed decisions about how to improve the state of the code. InnoGames uses SonarQube for many projects including Forge Of Empires which I currently work at. Over the years, I have seen a very positive impact on the overall quality of the code and would highly recommend trying it out.