Introduction
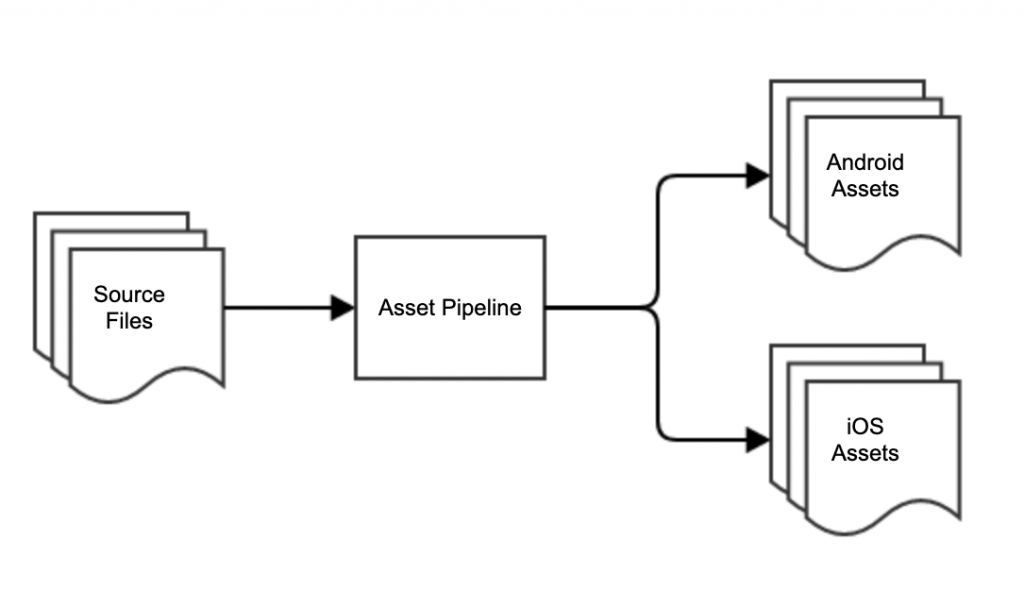
The steps it takes to turn source files (i.e. models, textures, etc.) into game-ready art assets can be summarized as “asset pipeline:” You give source files into one end of the pipeline, and (if everything goes right) optimized, ready-to-use game assets will come out on the other end. In-between, files will usually go through a transformation: They are converted to different file types, optimized using platform-specific compression methods, assembled into prefab game objects, and so on. When working with Unity, luckily, a lot of this work is already done for us by the editor, which comes with its own asset pipeline that handles file conversion, compression, etc.. However, there still will be manual steps to this process, such as adjusting import settings or assembling assets into prefabs.
There is a good chance that many thousand assets will have to go through this process, especially when you are working on a content-driven game, like, let’s say a city-builder. For the sake of efficiency, maintainability, fast iteration and your personal sanity, you will want to reduce the amount of manual steps this takes, as much as possible.
Anecdotally, neither artists nor developers feel all that responsible for the task of asset integration: Both want to focus on their side of the pipeline, and a good asset pipeline should enable them to do just that.
Goal
Artists prepare asset input, developers access asset output: Our goal is to reduce friction between these two worlds, so everyone can focus on what they can do best.
The perfect asset pipeline would require no manual procedures and run fully automated, giving everyone exactly what they need. That goal may not be realistically achievable, but with the right tools, we can at least make everyone’s life a little easier. These are the requirements, that we have identified for our asset pipeline:
- Automation: Turn source files into ready-to-use game assets with as little manual setup as possible. Where possible, we wanted this to go beyond texture compression and file conversions, and instead output game-ready prefabs.
- Batch-Processing: Allow to quickly adjust import settings of a bulk of assets, i.e. to make quick adjustments to the app’s download size.
- Validation: Perform asset validation and sanity checks, to catch simple mistakes, early on.
- Maintainability and Extendability: Make pipeline easy to manage, maintain and extend. Ideally, both artists and developers would be able to understand and adjust the asset pipeline.
Because we are working with Unity, we are extending the asset pipeline that comes built-in. This meant creating Unity extensions and custom editors, to add the functionality we were missing from the default workflows and meet our requirements.
Asset Name Validation
Most of our assets go through a simple validation step, before they are imported into Unity.
Unity’s asset pipeline starts the moment you add a new file into the project. For the bigger picture, however, let’s assume the asset pipeline begins at the point where the artist’s creative work ends: This could indeed be the moment someone imports the asset files into Unity, or it could be the moment an artist runs an export script from a 3D graphics application, such as Autodesk Maya.
In our workflow, artists will generally upload exported asset files into an SVN repository, from where the files can then be checked out and imported into Unity, if they weren’t already. Both artists and developers have access to this export repository, which means everyone can pull the latest assets and import them in Unity.
Introducing this intermediate step has another advantage: It gives us more control over what assets we actually want to (or allow to) import: We can use a pre-commit hook to decline commits to the export repository, and thus stop the upload of files that do not match certain criteria.
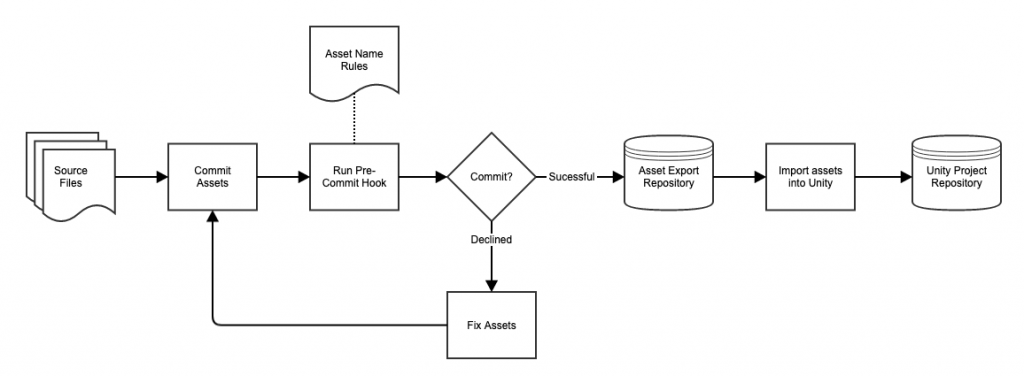
We use an elaborate pre-commit hook, that will check all submitted files, and decline a commit when a pre-defined list of rules has not been met. For example, a commit might be declined, if…
- An asset’s filename contains forbidden characters
- An asset’s filename does not match a pre-defined pattern (i.e. use of lower and upper case characters, prefixes, etc.)
- The file type is unknown or has not been white-listed
- An XML or JSON file is not valid
- …
When one or more rules has been broken, the pre-commit hook declines the transaction and gives a verbose error message, with details about what went wrong. This helps keep the project assets clean and is the first step of catching simple mistakes such as accidental commits (i.e. PSD files, invisible files, etc.) or violations of strict naming conventions.
Note: While this workflow has advantages, it also adds an extra step to the import process. It can catch common mistakes even before importing an asset into Unity, but also slows down iteration times. You may find that this trade off may not be worth it for all assets: When your assets do not have strict file name requirements and faster iteration is more important, you may want to skip these intermediate steps. In our project, for instance, UI graphics are usually imported into Unity, directly.
Creating Custom Import Tools in Unity
Extending the Unity Editor
To create custom tools, Unity gives us a number of options to extend its editor, such as custom editor windows or inspectors.
If you want to create a custom editor window, you need to create a new class that inherits from UnityEditor.EditorWindow, like this:
using UnityEditor;
using UnityEngine;

public class CustomEditorWindow : EditorWindow
{
    // The MenuItem attribute makes static functions accessible through Unity's menus.
    // It will allow us to open this window through Unity's top menu bar.
    [MenuItem("Example/Custom Editor Window")]
    public static void ShowWindow()
    {
        // Create a new window of this type or focus an existing one
        var window = GetWindow<CustomEditorWindow>("Example Window", true);
        // Setup and show window
        window.minSize = new Vector2(200, 200);
        window.Show();
    }

    // OnGUI is a Unity event that is called whenever the window is repainted.
    // This is where all of our GUI code needs to go.
    private void OnGUI()
    {
        // Draw a button that prints "Hello World" to the console
        bool buttonWasPressed = GUILayout.Button("Hello World");
        if (buttonWasPressed)
        {
            Debug.Log("Hello World!");
        }
    }
}
All editor-specific scripts (i.e. custom editor windows, inspectors, etc.) have to be inside a folder named “Editor”: This way Unity knows that it’s editor code and will not include it in your game builds. You can have as many “Editor” folders as you like and their exact location in your project is not relevant, as long as it is in the “Assets” folder.
Our tools also make extensive use of Unity’s TreeView class, which is an advanced GUI control that allows you to display data in a tree or list structure, with a lot of customizability. For information on how to use tree views, please refer to Unity’s manual, which also comes with a number of examples!
Working with Unity’s Asset Database
When handling assets from code in Unity, we have to work with Unity’s asset database API: The asset database keeps track of assets and provides functionality to import, create, delete, find and modify assets.
Here is a simple script that provides a static function to import assets from arbitrary file paths into Unity:
using System.IO;
using UnityEditor;

public class ImportFiles
{
    /// <summary>
    /// Import external files into the project. All files will be copied to the Assets root directory.
    /// </summary>
    /// <param name="paths">File path(s) to import.</param>
    public static void Import(params string[] paths)
    {
        // You can use StartAssetEditing() and StopAssetEditing(), to group any imports that happen inbetween:
        // This will speed up import considerably, when importing a large number of assets.
        AssetDatabase.StartAssetEditing();

        foreach (string sourcePath in paths)
        {
            var sourceFile = new FileInfo(sourcePath);
            // Ignore invalid paths
            if (!sourceFile.Exists)
            {
                continue;
            }

            // Path to import file to, in the Assets root directory
            string assetPath = "Assets/" + Path.GetFileName(sourcePath);

            // Copy the file from the source path to the target asset path
            sourceFile.CopyTo(assetPath, true);

            // Manually trigger an import for the new asset
            AssetDatabase.ImportAsset(assetPath);
        }

        AssetDatabase.StopAssetEditing();
    }
}
When copying new files into the “Assets” folder from code, they will not show up in Unity’s project window until they have been “formally” imported. In the example above we are importing the new assets explicitly, which is most efficient when working with a lot of files, but instead we could also call AssetDatabase.Refresh() and let Unity find any asset changes and import them, automatically. Otherwise you’d have to wait until Unity triggers an asset refresh itself, before the assets are actually imported.
Import Browser
As described above, in our project most import-ready source files are saved into a dedicated export repository. But how do you get these files into Unity? To import them into Unity, you have to move the files from the export repository to the Unity assets folder, one way or another.
The easiest way to make sure the source files are imported into Unity, would be to check out the export repository into a sub folder of the Unity project: All you would need to do, is update the repository, to import the latest assets.
However, this leaves us with two problems:
- Subtrees, submodules, etc. can be a hassle to manage
- You do not always want to import all assets or asset changes, just because they are available for import
That last point may seem counter-intuitive, because so far we were only concerned about importing assets, rather than not importing assets. But this becomes important when working in a complex project with large amounts of assets and branched versioning. By making sure you only import the assets and changes you actually need, you reduce the chances of creating merge conflicts, and can update or delete assets, without causing trouble on different feature branches.
What this means is you need to make conscious decisions of what files to actually import into Unity: To help with this task, we have created the Import Browser.
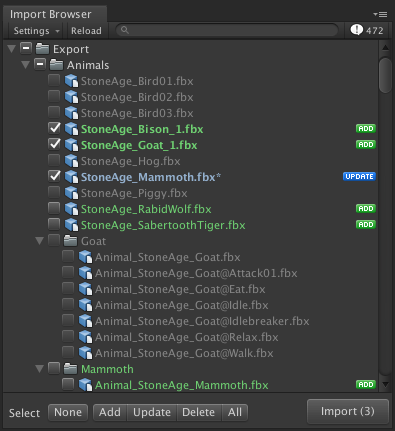
The Import Browser is a Unity custom editor and convenience tool, that allows the user to import files from a source directory, if those files do not yet exist in the Unity project or have been updated. Essentially, it compares the contents of source and target directory (export repository and Unity’s asset folder, respectively) and allows to copy files from one to the other, if the contents are not the same.
When importing a file through the Import Browser, it will be saved at a relative path identical to the one in the source directory, creating any missing parent folders, if necessary. This has the positive side effect, that folder structures in the export repository and Unity’s asset folder are the same: Saving a file into the export repository effectively becomes part of the asset integration, because it determines where the asset will later be found, in Unity.
This tool is especially useful when importing large amounts of assets at once and has a number of other convenience features, to make asset integration easier. Note, however, that using it is absolutely optional: Basically, the tool just copies assets from A to B – something that can still be done manually, if necessary or desired.
Once a source file has made its way into Unity, the actual asset import process begins.
Customizing Unity’s Asset Pipeline
When you add or update a file in Unity’s “Assets” folder, Unity will trigger an asset import. This import process is automatic, but can be customized.
Our custom asset pipeline tools are built upon two major components: A custom AssetPostprocessor and Unity’s preset feature.
AssetPostprocessor
To customize asset import, Unity provides a useful API to hook into its internal import process: The AssetPostprocessor class.
This class exposes a number of event functions, that are called during asset import and can be overwritten to implement custom behavior. Events such as…
OnPreprocessAsset: Is called directly before any asset is imported.OnPreprocessModel: Is called directly before any model is imported.OnPreprocessAnimation: Is called directly before any animation is imported.OnPostprocessModel: Is called after a model has been imported.OnPostprocessAllAssets: Is called after import of any number of assets has been completed.- …
This is where all the magic happens.
Basically, there are preprocessing events (called before an asset is imported) and postprocessing events (called after an asset has finished importing.) Preprocessing events are where you will make changes to an asset’s import settings, right before import. Postprocessing events are where you will further process your imported asset, for instance if you want to create a prefab from it, add a component to a model, and so on.
To create your own asset postprocessor, simply write a new editor class that inherits from AssetPostprocessor and overwrite any number of events you wish to hook into: Unity will run this class automatically, during asset import.
using UnityEngine;
using UnityEditor;

public class DisableMaterialImport : AssetPostprocessor
{
    void OnPreprocessModel()
    {
        // The variable "assetImporter" references the importer for the asset that is currently importing,
        // access it to adjust the asset's import settings.
        ModelImporter modelImporter = assetImporter as ModelImporter;
        modelImporter.importMaterials = false;
    }
}
Presets
Presets are an editor feature that have been added in Unity 2018.1. They allow you to easily copy serialized properties of components, assets, project settings, etc. and store them in an asset file, for reuse.
Presets are especially useful to modify asset import settings: In the editor, create a preset from an asset import settings inspector, to save and reuse its settings for other asset of the same type (i.e. models, audio, and so on). This can also be done from code, like this:
public static class PresetExample
{
   /// <summary>
   /// Copy import settings from one asset to another.
   /// </summary>
   /// <param name="sourceAssetPath">Path of asset to copy import settings from.</param>
   /// <param name="targetAssetPath">Path of asset to paste import settings to.</param>
   /// <returns>True if settings properties could be copied, false otherwise.</returns>
   public static bool CopyImportSettings(string sourceAssetPath, string targetAssetPath)
   {
      // Load asset importers for assets at the given paths.
      // Note that we need the importers, rather than references to the imported assets!
      var sourceAssetImporter = AssetImporter.GetAtPath(sourceAssetPath);
      var targetAssetImporter = AssetImporter.GetAtPath(targetAssetPath);

      // Create a new preset from the first importer and apply it to the second.
      Preset preset = new Preset(sourceAssetImporter);

      if (preset.CanBeAppliedTo(targetAssetImporter) == false)
      {
         Debug.LogError("Source and target asset types do not match!");
         return false;
      }

      return preset.ApplyTo(targetAssetImporter);
   }
}
Putting it together
With the help of asset postprocessors and importer presets, you can build a powerful, flexible asset pipeline: Prepare a number of import setting presets that match your needs and decide when and how to apply them, using your postprocessor.
Typical presets could be, for instance…
- High-Quality Textures
- UI Sprites
- Normalmaps
- Static Model
- Skinned Mesh
- …
Once you have presets like this, you just need to decide what asset you need to apply them to. In Unity’s manual you can find a simple implementation of an asset postprocessor, that applies presets to any asset in the same folder as the preset file.
For a more advanced example, you can check out the preset importer, which is part of a sample tool collection by Unity. This tool allows to create and mange import setting presets, which are applied to any asset that matches a pre-defined filter option.
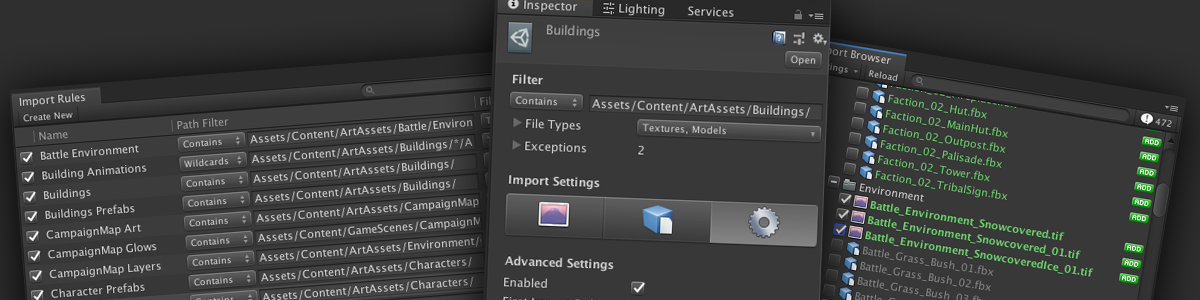
Asset Import Rules
For our custom import tools, we decided to go for a rules-based approach, similar to Unity’s sample preset importer: If an imported asset has a file path that matches the filter options of one of the pre-defined rules, that rule’s import settings will be applied to the asset.
This makes it easy to apply the same processing to a large number of assets, but still requires manual configuration, to set up and maintain those rules.
For this reason, we have put special emphasis on developing an easy-to-use graphical user interface: Ideally, both artists and developers should be able to read, understand and update this configuration.
Rules
Rule Assets
To store and configure our import rules, we are using our own rule assets: Every import rule is a ScriptableObject, saved to a separate, dedicated asset file. Each of these files contains three sub assets, one for each preset object: A texture, model and audio importer preset. These are the presets the rule will apply to any matching asset, on import.
Storing each rule in a separate asset – instead of using a single asset to contain all rules, for instance – makes it easier to work with version control, because you will only create file changes to rules you have actually touched. This reduces the risk of merge conflicts, in case two people have edited two different rules.
To make modifying a rule asset as easy as possible, we have written a sophisticated custom inspector.
Filter Options
Each rule has asset filter options that determine which assets this rule is applicable to.
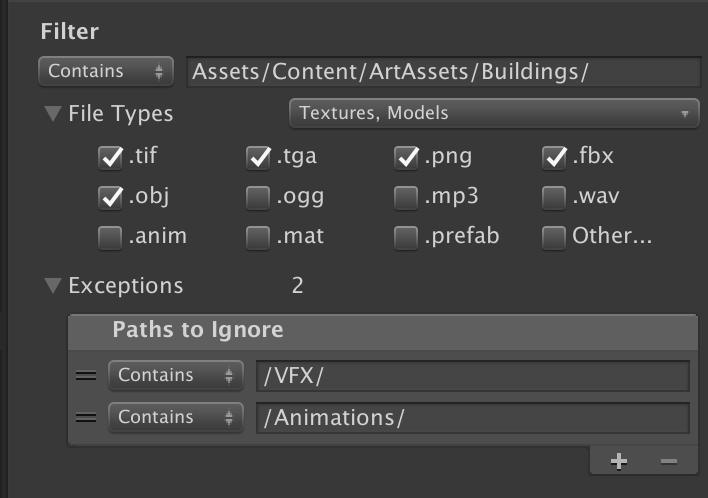
The filter will check the imported asset’s file path, to see if it matches its criteria:
- Asset path must match the filter’s string pattern, for instance…
- Filename contains “_Normal”
- Path begins with “Assets/Sprites/UI”
- File extension must match the list of whitelisted file types, for instance…
- Must be a “.png” file
- Must be a model or audio file
- There must be no applicable exception, excluding that path/asset
During import, the custom asset postprocessor will trigger and go through all import rules in the project and apply the first rule with matching filter options. This limitation is intentional: There should never be more than one import rule associated with an asset, to avoid rules processing the same asset twice or overwriting each others’ preset import settings.
Importer Presets
As described above, each rule comes with three importer presets; one for textures, one for models and one for audio assets. The import rule’s custom inspector will display the editor of the importer you wish to modify, if it’s applicable (that is, the inspector will not show the audio importer settings, when the rule is set to apply to textures, only.)
When a rule is applied to a matching asset during import, it will apply the appropriate import preset: This will overwrite all serialized properties of the asset’s importer with values from the preset. However, there are certain importer properties that we do not want to overwrite, because they are specific to the asset we are importing. To make sure we do not lose those values, we have to first cache them, apply the importer preset, and then re-assign the previously cached values.
Unfortunately, this is a limitation of Unity’s preset feature. There is no way to apply properties selectively, or exclude certain target values from being overwritten. Finding out which properties you want to overwrite and which ones you want keep, is a trial and error process.
There’s one more catch with presets, that we need to keep in mind: Some properties of an importer can only be edited in the inspector when there is a target asset to modify. When we are working with a preset only, however, there is no such asset. That means the inspector of the importer (preset) may not expose properties we might want to modify. This is the case for the animation import settings of the model importer.
Also, there has been a Unity bug since version 2019.2 that makes it impossible to change platform-specific texture settings, from a preset inspector; a particularly important importer setting, especially when targeting mobile platforms.
We have solved both of these problems by creating custom editors (asset processors, see below) to configure those properties, as a workaround.
Asset Processors
Often times you want to do more than just apply importer presets to new assets. In cases like this, our rules system allows us to set up “asset processors”, to further extend and customize the asset pipeline.
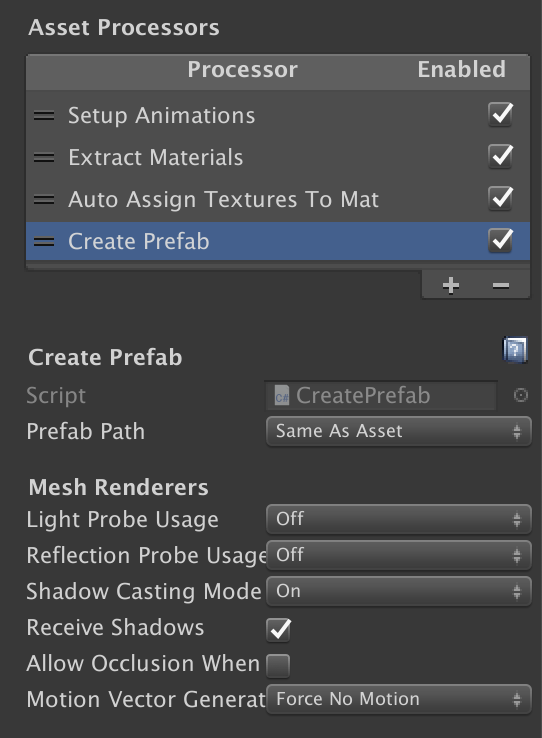
These are not to be confused with Unity’s AssetPostprocessor classes, even though they do a similar job: Just like an asset postprocessor, our asset processors hook into events such as OnPreprocessAsset, OnPostprocessModel, and so on, during import. However, they are different from standard postprocessors, in that…
- They are attached to a specific rule, so they only run for assets matching that rule
- They are
ScriptableObjects, which means they can be easily reused with different settings and expose serialized properties, in the inspector
Creating a new asset processor is as simple as inheriting from its base class, overriding the event functions and adding it to an import rule from its advanced settings tab.
using AssetPipeline.AssetImportRules.Editor.Tool;
using UnityEditor;
using UnityEngine;

/// <summary>
/// Simple asset processor to assign an array of asset labels.
/// </summary>
public class SetAssetLabels : AssetProcessor
{
    // "Labels" is a serialized field and can be set through the inspector
    public string[] Labels;

    public override void OnPostprocess(Object asset, string assetPath)
    {
        AssetDatabase.SetLabels(asset, Labels);
    }
}
The import rule inspector will find a list of available asset processor through reflection, by listing all classes that inherit from AssetProcessor. When adding a new asset processor to a rule, it will create an instance of that processor and add it as a sub object to the rule asset.
For the sake of simplicity, the tool currently allows every asset processor to be added exactly once, to an import rule. This way the user can’t accidentally add the same processor twice, which may lead to unexpected results; a restriction that we haven’t had any problems with, yet.
Also, the inspector’s list of attached asset processors is re-orderable: When the import rule goes through the list of processors to run, it will always start at the top and go through the list, one by one. Depending on how you want to process the imported asset, the order of the list might be relevant: One asset processor could rely on the result of an another one, that needs to be run first.
Asset processors in combination with import rules are a very powerful and flexible tool. With this modular approach, you can develop a set of processors that are tailored to your needs and can quickly adjust, apply and configure them, without any code changes.
We use asset processors, for instance, to create prefabs form imported model assets, automatically assign textures to materials, or create sprite atlases.
Rules Browser Window
Using separate assets to store import rules has advantages, but it also makes it more difficult to manage rules, on a more global scale.
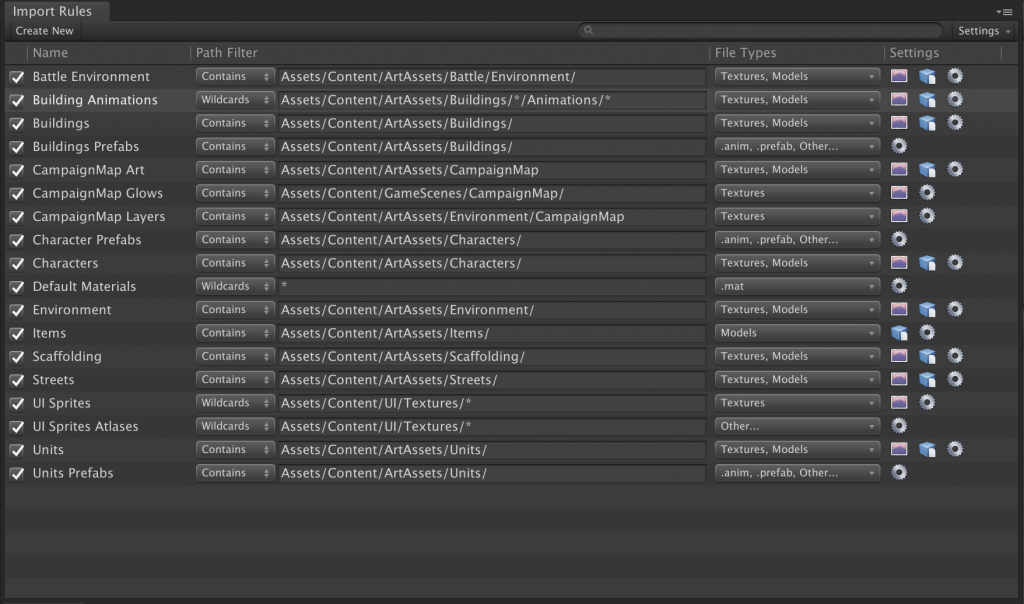
To help with that, we have created the rules browser: This window will list all import rules that can be found in the project. In addition to providing a comprehensive overview, the browser also allows you to quickly create, edit and delete import rules, all in one place.
Conclusion
Creating custom tools and Unity editor extensions to help with asset import and integration can speed up your workflows, significantly.
In this article I have described a number of techniques and concepts that you can use to build an efficient, customizable asset pipeline, and how we have utilized these to build ours.
One of the biggest challenges we have run into, are the limitations of Unity’s presets feature, which required a number of inelegant workarounds to achieve the behavior we want.
Another area that can still be improved, is managing automatically generated assets: For instance, automatically created prefabs will currently not be cleaned up, if the asset is moved or deleted, leaving behind an orphaned prefab. In a next step we could start keeping track of import dependencies like this, to reduce asset duplication and manual clean-up.