
Summary
In this article you will learn a simple way how to customize the project window of the Unity Editor. We will create a little framework to let the user show additional columns with information about the assets. I will guide you through every step so everything should be clear even for beginners in editor scripting.
Intro
I am Andreas Hackel, Technical Artist at one of InnoGames new game projects. Part of my job is to create tools for our artists that are convenient and fun to use. Very often this means to customize the Unity Editor. Fortunately this can be done very easily.
When you open the project window in the editor and switch from icon to list view mode you can see that there is a lot of space next to the the names of the assets listed there. It would be great if we could use that space to show some detail information about the assets. to do that we need to draw additional text whenever the editor repaints the project window. Unity provides a callback for this purpose.
Callback
You can assign a callback to EditorApplication.projectWindowItemOnGUI. The callback will be called for every asset on every OnGUI event. As parameters you get the GUID of the asset and the rect of the area reserved for the asset in the project window: void DrawAssetDetails(string guid, Rect rect)
What is a GUID?
GUID stands for Global Unique Identifier. Unity uses GUIDs to identify assets stored in a file. While the file path can change (the file can be renamed or moved) the GUID never changes. More information about GUIDs can be found here:
Assets Objects and Serialization Best Practices
Simple Example
Let’s create a simple customization which draws the GUID of each asset next to the name.
using UnityEditor;
using UnityEngine;

[InitializeOnLoad]
public static class ProjectWindowDetails {

   static ProjectWindowDetails()
   {
      EditorApplication.projectWindowItemOnGUI += DrawAssetDetails;
   }

   private static void DrawAssetDetails(string guid, Rect rect)
   {
      // Right align label:
      const int width = 250;
      rect.x += rect.width - width;
      rect.width = width;

      GUI.Label(rect, guid);
   }
}
We made ProjectWindowDetails a static class. Also we added the [InitializeOnLoad] attribute so the constructor will be called when the editor starts up or whenever the scripts are being recompiled. In the constructor we assign our callback to EditorApplication.projectWindowItemOnGUI. Now whenever the editor draws an asset in the project window DrawAssetDetails will be called. In DrawAssetDetails we just draw a label with the guid we get as a parameter. We have to modify the rect a bit otherwise we would draw the guid on top of the name of the asset. Let’s see how it looks:
Looking good, but…
Looks good and does what we expected. But if we change the view mode to icons or look at the folder tree you will see that there are also GUIDs being drawn on top of the folder names and icons. Let’s clean this up:
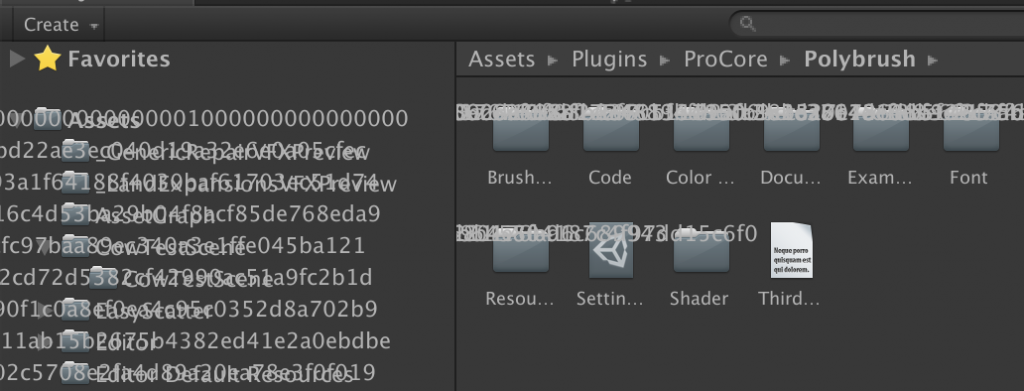
Cleaning up
Here we added a condition to not draw anything if the asset is not a main list asset. This means that the rect is not higher than 20. If so we would be in icon view mode. And the x value of the rect is smaller than 16. If it would be larger than it would be a child item in the tree view which we don’t want to show. You can call this a hack, but since the callback does not give us any other information than the rect and the guid we have to improvise.
We will also abort our callback if the application is playing or if the current event type is not EventType.Repaint. We do this for performance reasons because the callback can be called very often and may slow down the editor.
private static void DrawAssetDetails(string guid, Rect rect)
{
   if (Application.isPlaying || Event.current.type != EventType.Repaint || !IsMainListAsset(rect))
   {
      return;
   }

   // Right align label:
   const int width = 250;
   rect.x += rect.width - width;
   rect.width = width;

   GUI.Label(rect, guid);
}

private static bool IsMainListAsset(Rect rect)
{
   // Don't draw details if project view shows large preview icons:
   if (rect.height > 20)
   {
      return false;
   }

   // Don't draw details if this asset is a sub asset:
   if (rect.x > 16)
   {
      return false;
   }

   return true;
}
Let’s see hw it looks now:
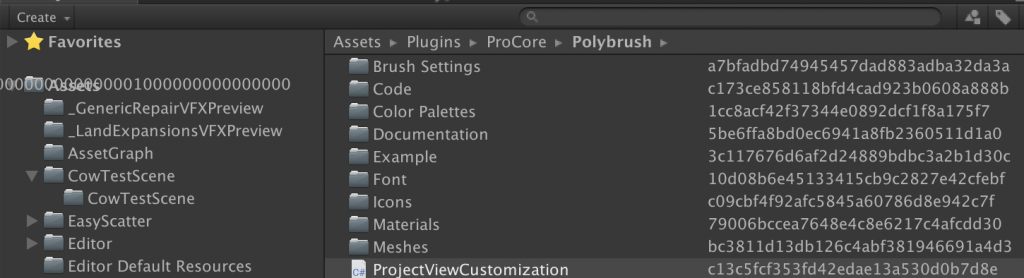
Much better already. There is still an issue with the root asset folder. Basically we can ignore all folders. Let’s do that:
Ignoring Folders
We added another condition which checks if the asset is a folder. If so we don’t draw anything. Unfortunately AssetDatabase.IsValidFolder does not work with with GUIDs but requires an asset path. We have to get that from the asset database. But we may need it anyway later to get some details from the asset that we may want to show.
private static void DrawAssetDetails(string guid, Rect rect)
{
   if (Application.isPlaying || Event.current.type != EventType.Repaint || !IsMainListAsset(rect))
   {
      return;
   }

   var assetPath = AssetDatabase.GUIDToAssetPath(guid);
   if (AssetDatabase.IsValidFolder(assetPath))
   {
      return;
   }

   var asset = AssetDatabase.LoadAssetAtPath<UnityEngine.Object>(assetPath);
   if (asset == null)
   {
      // this entry could be Favourites or Packages. Ignore it.
      return;
   }

   // Right align label:
   const int width = 250;
   rect.x += rect.width - width;
   rect.width = width;

   GUI.Label(rect, guid);
}
Also we need the actual asset object to get some details later. Therefore we have to load it from the asset database.
Note
The need to call AssetDatabase.GUIDToAssetPath() and AssetDatabase.LoadAssetAtPath<>() is a dirty part of this tool because the project window knows the asset and the asset path internally but does not expose it to the callback. You can look into the source code of the project window if you want to see how the callback is being called (ProjectBrowser.cs on Unity GitHub):
void OnGUIAssetCallback(int instanceID, Rect rect)
{
  // User hook for rendering stuff on top of assets
  if (EditorApplication.projectWindowItemOnGUI != null)
    {
        string guid = AssetDatabase.AssetPathToGUID(AssetDatabase.GetAssetPath(instanceID));
        EditorApplication.projectWindowItemOnGUI(guid, rect);
    }
}
Making it extendible
So far we just added a new column to the project window that shows guids. But it would be nice if we could display more columns with any data. Let’s create a little framework for that:
We will create a class for every column or asset detail the user could show in the project window. This class will retrieve the information we want to show in the specific column and output it to a string that ProjectViewDetails can use to draw columns.
First we need a base class for the details:
public abstract class ProjectWindowDetailBase
{
   private const string ShowPrefsKey = "ProjectWindowDetails.Show.";
   public int ColumnWidth = 100;
   public string Name = "Base";
   public TextAlignment Alignment = TextAlignment.Left;

   public bool Visible
   {
      get
      {
         return EditorPrefs.GetBool(string.Concat(ShowPrefsKey, Name));
      }

      set
      {
         EditorPrefs.SetBool(string.Concat(ShowPrefsKey, Name), value);
      }
   }

   public abstract string GetLabel(string guid, string assetPath, Object asset);
}
The base class has a Visible property that is stored in Unity’s editor preferences. We will use this property to let the user hide individual columns later. Every detail also needs to override GetLabel() to provide a string that will be displayed in this column. The fields ColumnWidth, Name and Alignment are set to default values that can be overridden.
Implementing a project window detail class to show GUIDs
Now the actual implementation of our GUID detail looks like this:
public class GuidDetail : ProjectWindowDetailBase
{
   public GuidDetail()
   {
      Name = "Guid";
      ColumnWidth = 230;
   }

   public override string GetLabel(string guid, string assetPath, Object asset)
   {
      return guid;
   }
}
Quite straightforward. Now let’s see how we can use this in our ProjectWindowDetails class. At this point I will guide you through the final implementation of ProjectWindowDetails.
Getting a list of all project window detail classes
The ProjectWindowDetails class needs a list of all details. We will use reflection to get all classes that have been derived from ProjectWindowDetailBase, create an instance of each and store them in a list. Now whenever you create a new detail class it will automatically be included in this list.
private static readonly List<ProjectWindowDetailBase> _details = new List<ProjectWindowDetailBase>();
private static GUIStyle _rightAlignedStyle;

private const int SpaceBetweenColumns = 10;
private const int MenuIconWidth = 20;

static ProjectWindowDetails()
{
   EditorApplication.projectWindowItemOnGUI += DrawAssetDetails;

   foreach (var type in GetAllDetailTypes())
   {
      _details.Add((ProjectWindowDetailBase)Activator.CreateInstance(type));
   }
}

public static IEnumerable<Type> GetAllDetailTypes()
{
   // Get all classes that inherit from ProjectViewDetailBase:
   var types = Assembly.GetExecutingAssembly().GetTypes();
   foreach (var type in types)
   {
      if (type.BaseType == typeof(ProjectWindowDetailBase))
      {
         yield return type;
      }

   }
}
Drawing the project window details
Now we need to extend the callback method so it renders the data from the details. In line 69 we loop over all details, filter out invisible ones and draw each one.
private static void DrawAssetDetails(string guid, Rect rect)
{

...

   var assetPath = AssetDatabase.GUIDToAssetPath(guid);
   if (AssetDatabase.IsValidFolder(assetPath))
   {
      return;
   }

   var asset = AssetDatabase.LoadAssetAtPath<UnityEngine.Object>(assetPath);
   if (asset == null)
   {
      // this entry could be Favourites or Packages. Ignore it.
      return;
   }

   for (var i = _details.Count - 1; i >= 0; i--)
   {
      var detail = _details[i];
      if (!detail.Visible)
      {
         continue;
      }

      rect.width = detail.ColumnWidth;
      rect.x -= detail.ColumnWidth + SpaceBetweenColumns;
      GUI.Label(rect, new GUIContent(detail.GetLabel(guid, assetPath, asset), detail.Name),
         GetStyle(detail.Alignment));
   }
}
Project window detail alignment
Some information like numbers we want to render right aligned so that the user can read them more easily. Unfortunately Unity does not let us create styles in the constructor. So we create a style for this purpose the first time we need it.
private static GUIStyle GetStyle(TextAlignment alignment)
{
   return alignment == TextAlignment.Left ? EditorStyles.label : RightAlignedStyle;
}

private static GUIStyle RightAlignedStyle
{
   get
   {
      if (_rightAlignedStyle == null)
      {
         _rightAlignedStyle = new GUIStyle(EditorStyles.label);
         _rightAlignedStyle.alignment = TextAnchor.MiddleRight;
      }

      return _rightAlignedStyle;
   }
}
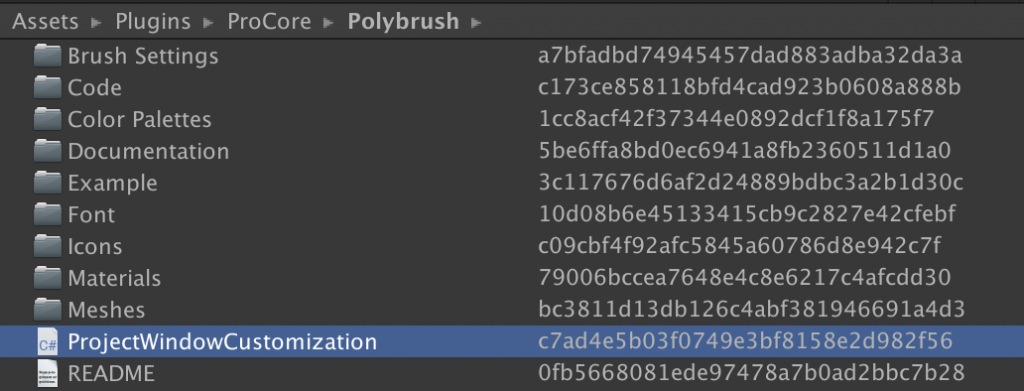
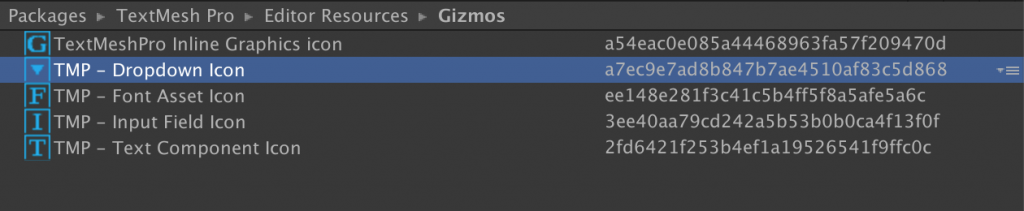
This is how it looks:
GUID details in action
Now our framework is complete. So far there is only one detail, GUIDs, that the user can show. But now it’s very easy to add more details. We will add more soon but first let’s see how we can add a context menu.
Adding a context menu
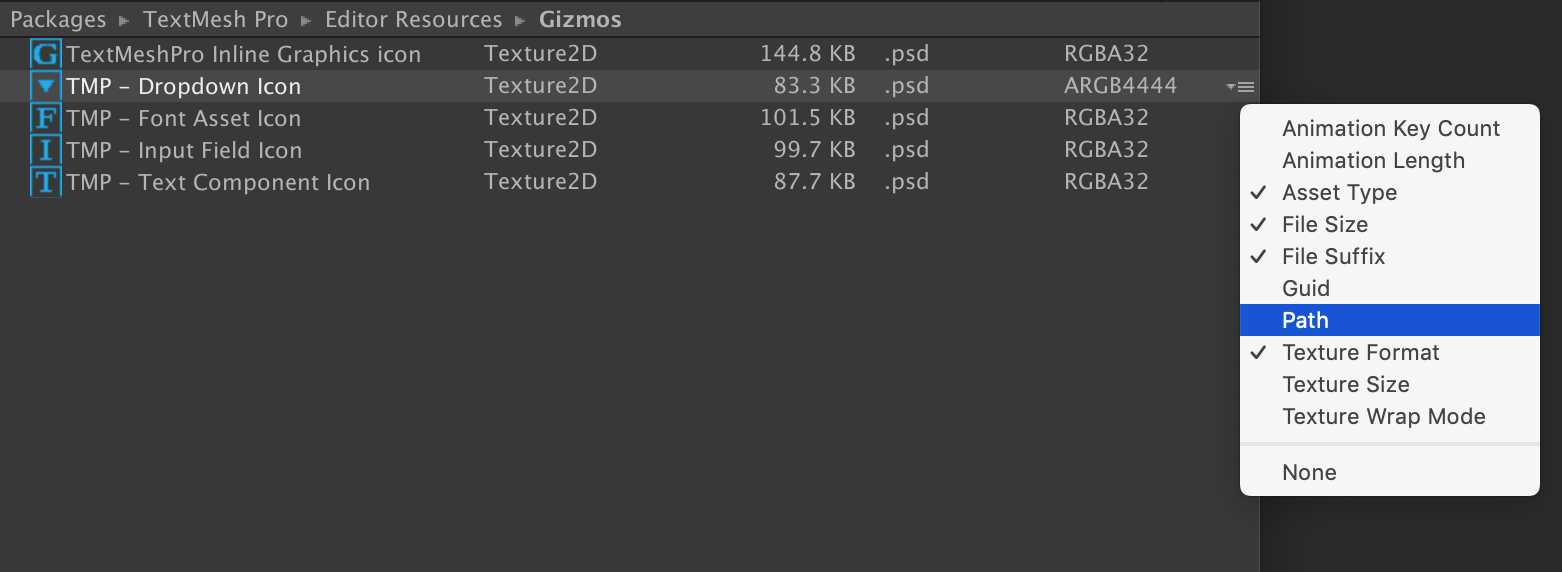
We want the user to toggle the visibility of individual details. A method that’s both easy to use for the user and simple to implement is a context menu. Unfortunately the project window already uses context menus when the user right clicks on an asset for asset management. We need to find a different spot for our context menu.
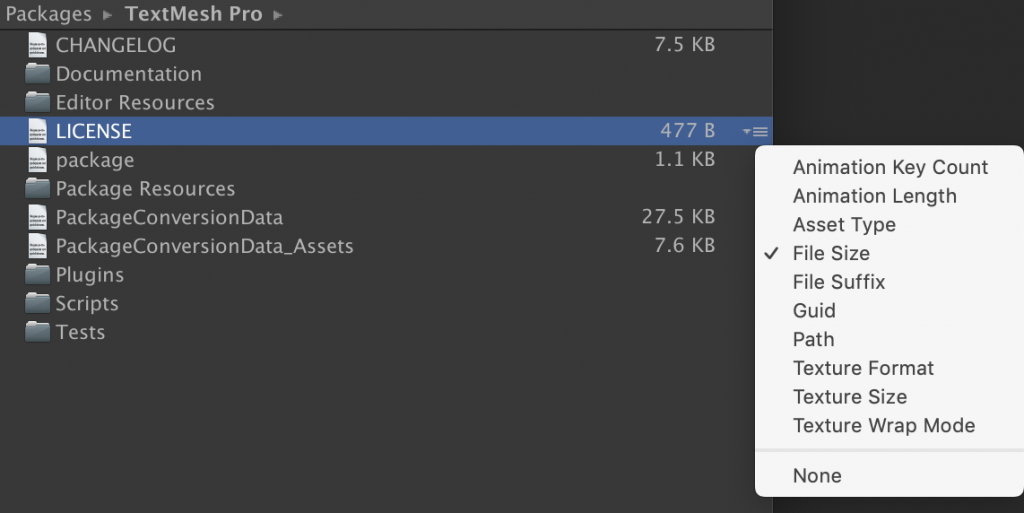
On the selected asset we will show a little burger menu icon. Clicking on that will pop up our context menu. Since the user does not need to interact with it very often this design leaves the original context menu (and therefore the behavior the user expects) on all remaining area of the project window
Context menu handling
Let’s have a closer look at the code in DrawAssetDetails() that handles the context menu:
   if (Event.current.type == EventType.MouseDown &&
      Event.current.button == 0 &&
      Event.current.mousePosition.x > rect.xMax - MenuIconWidth)
   {
      Event.current.Use();
      ShowContextMenu();
   }

   if (Event.current.type != EventType.Repaint)
   {
      return;
   }

   var isSelected = Array.IndexOf(Selection.assetGUIDs, guid) >= 0;

   // Right align label and leave some space for the menu icon:
   rect.x += rect.width;
   rect.x -= MenuIconWidth;
   rect.width = MenuIconWidth;

   if (isSelected)
   {
      DrawMenuIcon(rect);
   }
In line 63 we check if the user clicked with the left mouse button within the space reserved for the menu icon. If so we show the context menu:
private static void ShowContextMenu()
{
   var menu = new GenericMenu();
   foreach (var detail in _details)
   {
      menu.AddItem(new GUIContent(detail.Name), detail.Visible, ToggleMenu, detail);
   }
   menu.AddSeparator("");
   menu.AddItem(new GUIContent("None"), false, HideAllDetails);
   menu.ShowAsContext();
}


private static void HideAllDetails()
{
   foreach (var detail in _details)
   {
      detail.Visible = false;
   }
}

public static void ToggleMenu(object data)
{
   var detail = (ProjectWindowDetailBase) data;
   detail.Visible = !detail.Visible;
}
Drawing the menu icon
This is how we draw the menu icon. The only noteworthy thing to say here is that we need to modify the y-value of the rect to align the icon properly on the vertical axis.
private static void DrawMenuIcon(Rect rect)
{
   rect.y += 4;
   var icon = EditorGUIUtility.IconContent("d_LookDevPaneOption");
   EditorGUI.LabelField(rect, icon);
}
Editor Icons
You may wonder where "d_LookDevPaneOptions" came from. The Unity Editor has a lot of icons build in. You can find an overview of them here:
https://unitylist.com/p/5c3/Unity-editor-icons
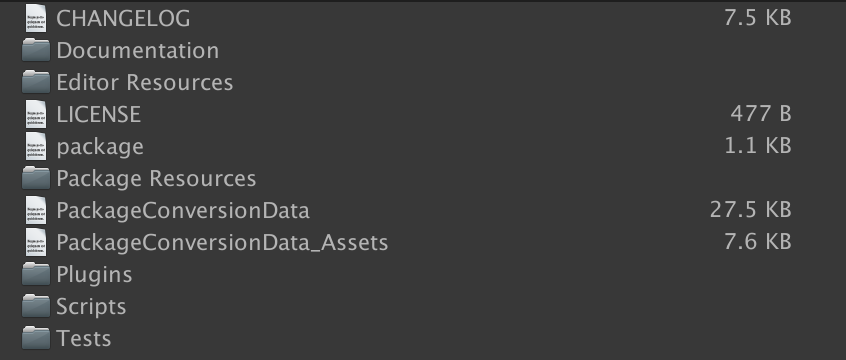
Adding a file size column
GUIDs it probably not something everyone is interested to see. Let’s create another detail class that shows the file size of assets in the project window. This time we want right alignment and a column width of 80 and some custom formatting of bytes.
public class FileSizeDetail : ProjectWindowDetailBase
{
   public FileSizeDetail()
   {
      Name = "File Size";
      Alignment = TextAlignment.Right;
      ColumnWidth = 80;
   }

   public override string GetLabel(string guid, string assetPath, Object asset)
   {
      return EditorUtility.FormatBytes(GetFileSize(assetPath));
   }

   private long GetFileSize(string assetPath)
   {

      string fullAssetPath =
         string.Concat(Application.dataPath.Substring(0, Application.dataPath.Length - 7), "/", assetPath);
      long size = new FileInfo(fullAssetPath).Length;
      return size;
   }
}
Conclusion
This article should give you an idea how you can customize the project window of the Unity Editor. You can use our implementation ProjectWindowDetails to let the user show information about the assets. You can also create your own custom detail classes very easily. Also you learned about writing editor code in Unity in general and some of the quirks you need to be aware of.
Customizing the Unity Editor is very powerful and can make working with the editor much more efficient and fun to use.
You can find the code on GitHub:
https://github.com/innogames/ProjectWindowDetails