
Introduction
Automated tests play a very important role in our games. In our daily business we add new game features, improve existing ones or do refactoring based on technical debt. Every single change could lead to a bug that breaks our game. Even simple changes like updating a version of an external dependency could lead to unexpected behaviour. Our tests ensure that the games are always in a stable condition and that the quality meets our expectations.
There are several types of automated tests that we use in our games. In this article I will focus on Backend System Integration Tests. In these tests, we test the entire game backend as a whole, including a real database. Usually they consist of three stages:
- Preparation: Prepare a scenario in which we want to run the test action. This means setting up a test player with all conditions and requirements needed for the test action.
- Execution: Run the action that we want to test. In most cases we call an API endpoint here.
- Assertion: Validate that the outcome is the one that we expect.
Unlike in end-to-end tests, in which the preparation stage also uses API endpoints, the System Integration Tests directly manipulate the database. This has the advantage that it’s more flexible and leads to faster test executions. The drawback is that you have to basically mirror the business logic in your tests.
One problem we always faced was that the preparation stage could already make the tests unreadable, even in very simple test scenarios. Let’s take a city builder game as example. We want to write a test where we collect a finished production from a building that produces coins.

The preparation stage contains several steps:
- Create a new player
- Create a city for this player (imagine we can have multiple cities per player)
- Place a building into the city that can produce coins
- Create a production that is finished and can be collected
- Set the initial coin amount of the player to do proper validation
Think a moment how you would write this test. A common way to go would be to create reusable test helper classes that we can use for the preparation steps. In the best case we have one line per step. It could look like this:
@Test
public void testCollectProduction() {
    var player = playerTestHelper.createPlayer();
    var city = cityTestHelper.createMainCity(player);
    var building = buildingTestHelper.createBuilding(city, "SomeProductionBuilding");
    productionTestHelper.createFinishedProduction(building, ResourceConstants.COINS, 20);
    resourceTestHelper.setAmount(player, ResourceConstants.COINS, 100);

    // call collect production endpoint

    // assert that I have 120 coins
}
But based on our experience it’s not always that easy. At some point you need to be more flexible. Either you end up with more parameters in a helper method or you have to create more and more helper methods to keep the test readable. It can happen really fast that the preparation code is bigger than the rest of the test. Looking at this test in a month, you need some moments to understand what happens.
Making the test setup readable
I would like to immediately understand what a test is doing, even when I come back to it after a year. To accomplish that, we introduced a builder-like API that allows us to define the whole test scenario by just configuring a scenario object:
@Test
public void testCollectProduction() {
    buildScenario(scenario -> scenario
        .withPlayer(player -> player
            .withResource(ResourceConstants.COINS, 100)
            .withCity("MainCity", city -> city
                .withBuilding("SomeProductionBuilding", building -> building
                    .withProduction(production -> production
                        .withResource(ResourceConstants.COINS)
                        .withAmount(20)
                        .withFinishNow()
                    )
                )
            )
        )
    );

    // call collect production endpoint

    // assert that I have 120 coins
}
As you can see, the test setup is much easier to read. The Indentation makes it clear which configuration belongs to which entity and which entity belongs to which parent entity. The builder-like approach along with autocompletion makes it also fun to write such tests. We don’t have to think about test helper classes that need to be injected and if there’s a method that provides the functionality I need. We simply have to configure the scenario object by using the provided with-methods. The actual creation of entities happens in the background in the buildScenario() method.
But where do we get the generated IDs from? We created a building entity in the background, but we need to know the generated ID for the “collect production” action. For this case we can make use of reference objects:
@Test
public void testCollectProduction() {
    // create a reference object
    var buildingRef = new AtomicReference<Building>();

    buildScenario(scenario -> scenario
        .withPlayer(player -> player
            .withResource(ResourceConstants.COINS, 100)
            .withCity("MainCity", city -> city
                .withBuilding("SomeProductionBuilding", building -> building
                    .entityRef(buildingRef) // <-- reference object should contain this building entity
                    .withProduction(production -> production
                        .withResource(ResourceConstants.COINS)
                        .withAmount(20)
                        .withFinishNow()
                    )
                )
            )
        )
    );

    // call collect production endpoint with buildingId: buildingRef.get().getId()

    // assert that I have 120 coins
}
For the reference, we can use any simple reference holder. Java already comes with an AtomicReference class that provides the functionality we need, so we’re using this one for convenience reasons. We just create a reference object before building the scenario (of course this object is empty at that point). When buildScenario() creates the entities, the reference objects are also filled with the created entities. That means after buildScenario() was called, we can access the entities via referenceObject.get().
That’s nice! But the full power of reference objects will be clear in the next example. Let’s say we have workers that we can send to buildings in order to boost it. How can we assign a building to a worker when the building is not yet created? Just use the reference object:
@Test
public void testCollectProduction() {
    // create a reference object
    var buildingRef = new AtomicReference<Building>();

    buildScenario(scenario -> scenario
        .withPlayer(player -> player
            .withResource(ResourceConstants.COINS, 100)
            .withCity("MainCity", city -> city
                .withBuilding("SomeProductionBuilding", building -> building
                    .entityRef(buildingRef)  // <-- reference will be filled with this building entity
                    .withProduction(production -> production
                        .withResource(ResourceConstants.COINS)
                        .withAmount(20)
                        .withFinishNow()
                    )
                )
                .withWorker(worker -> worker
                    .withAssignedBuilding(buildingRef)  // <-- use the referenced building here
                )
            )
        )
    );

    // ...
}
You can see that we used the same reference object in two places. In one place it will be filled with the entity and in another place we use the created entity. Of course you have to make sure that the building is created first before creating the workers. But in the test itself we don’t have to care about it.
The implementation
There are two main components. You already saw the scenario object in action. This and all its children are called Configuration classes (all of them having a “Given” prefix). In addition we have the Setup classes (With a “Setup” suffix) that take care of the actual entity creation.
Configuration classes
There should be a Configuration class per domain logic or entity that can exist as a test requirement. The root class is the GivenScenario class. An instance of this class, the scenario object, is created and can be configured by calling the buildScenario() method which you saw in the examples earlier.
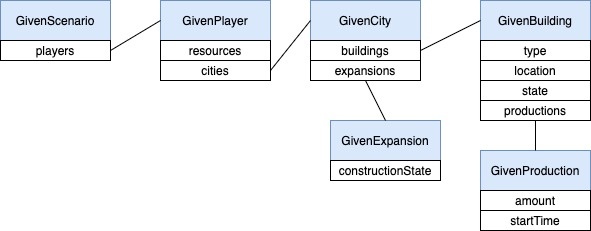
In our case the GivenScenario object contains a list of GivenPlayer objects, a GivenPlayer contains the player resources and cities, and so on. This should reflect your business logic. So, if a building belongs to a city, the GivenCity object should contain GivenBuilding objects.
A Configuration class typically …
- contains “with”-methods in order to configure it. A with-method is a kind of setter method, but should
- always return its own instance in order to provide a fluent API
- accept a Consumer parameter in order to configure the child object
- contains getter methods for all configurations which should be used by the Setup classes
- contains a reference to the Entity that is created by the Setup class. We abstracted this part to a GivenEntity class that you can find in the following example.
public class GivenScenario {

    @Getter
    private final List<GivenPlayer> players = new ArrayList<>();

    public GivenScenario withPlayer(Consumer<GivenPlayer> playerConsumer) {
        GivenPlayer givenPlayer = new GivenPlayer();
        playerConsumer.accept(givenPlayer);
        players.add(givenPlayer);
        return this;
    }

}
public class GivenPlayer extends GivenEntity<GivenPlayer, Player> {

    @Getter
    private final Map<String, Long> resources = new HashMap<>();

    @Getter
    private final List<GivenCity> cities = new ArrayList<>();

    public GivenPlayer withResource(ResourceConstants resourceId, long amount) {
        resources.put(resourceId.getKey(), amount);
        return this;
    }

    public GivenPlayer withCity(String cityDefinitionId, Consumer<GivenCity> cityConsumer) {
        GivenCity givenCity = new GivenCity(cityDefinitionId);
        cityConsumer.accept(givenCity);
        cities.add(givenCity);
        return this;
    }

    public GivenPlayer withCity(String cityDefinitionId) {
        cities.add(new GivenCity(cityDefinitionId));
        return this;
    }

}
public abstract class GivenEntity<G, E> {

    private AtomicReference<E> entityReference = new AtomicReference<>();

    @SuppressWarnings("unchecked")
    public G entityRef(AtomicReference<E> ref) {
        if (entityReference.get() != null) {
            ref.set(entityReference.get());
        }
        entityReference = ref;
        return (G) this;
    }

    public E getEntity() {
        var entity = entityReference.get();
        if (entity == null) {
            throw new IllegalStateException("Entity not set");
        }
        return entity;
    }

    public void setEntity(E entity) {
        entityReference.set(entity);
    }

}
Setup classes
A Setup class is responsible for building a specific part of the test scenario. In most cases there is a Setup class per domain logic or entity.
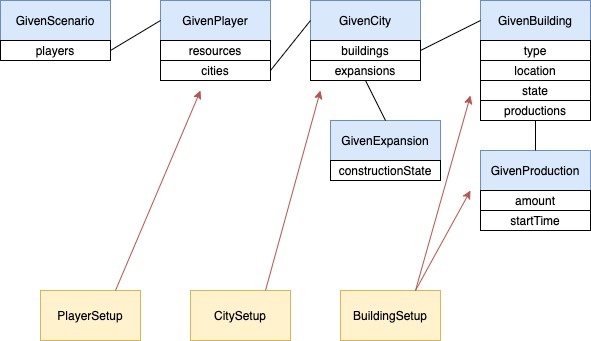
For example the CitySetup class is responsible for creating all cities defined in the scenario. The BuildingSetup class creates the buildings and also takes care of starting its productions.
Here’s an example of the CitySetup class:
@Component
@Order(ScenarioSetupPartOrder.CITY)
@RequiredArgsConstructor
public class CitySetup implements ScenarioSetupPart {

    private final CityService cityService;
    private final CityInitService cityInitService;
    private final GameDesignService gameDesignService;

    @Override
    public void setUp(GivenScenario scenario) {
        scenario.getPlayers().forEach(givenPlayer -> givenPlayer
            .getCities().forEach(givenCity -> createCity(givenPlayer, givenCity)));
    }

    private void createCity(GivenPlayer givenPlayer, GivenCity givenCity) {
        Player player = givenPlayer.getEntity();
        CityDefinition cityDefinition = gameDesignService.get(CityDefinition.class, givenCity.getCityDefinitionId());

        City city = cityService.find(player.getId(), cityDefinition)
            .orElseGet(() -> cityInitService.startNewCity(player, cityDefinition, Instant.now()));

        givenCity.setEntity(city);
    }

}
public interface ScenarioSetupPart {

    void setUp(GivenScenario scenario);

}
public class ScenarioSetupPartOrder {

    public static final int PLAYER = 1;
    public static final int RESOURCE = 2;
    public static final int CITY = 3;
    public static final int EXPANSION = 4;
    public static final int BUILDING = 5;

}
While the setUp() method receives the complete scenario object, it should just pick the information it needs to create the entities. After an entity was created, it should be passed to the configuration object (e.g. givenCity.setEntity(city)) which then fills the reference object to make it accessible in following Setup classes and tests.
As some Setup classes are dependent on others, the order is important. For instance the CitySetup class accesses the Player Entity which was created by the PlayerSetup before. The order can be ensured by an Order-Annotation on each Setup class, as you can see in the example above. We also created a ScenarioSetupPartOrder class to easily maintain the order. The Order-Annotation is part of the Spring Framework. If you inject a list of dependencies (e.g. List<ScenarioSetupPart>) it makes sure that this list is sorted based on the defined order.
Putting it together
Now that we have the Configuration and Setup classes defined, we can look at the buildScenario() method that should be placed in the base test class:
protected void buildScenario(Consumer<GivenScenario> scenarioConsumer) {
    scenario = new GivenScenario();
    scenarioConsumer.accept(scenario);
    scenarioSetup.setUp(scenario);
}
It creates an object of GivenScenario each time it is called. The Consumer parameter allows the caller to configure the object. Afterwards the scenarioSetup.setUp() method is called which just delegates to the specific Setup classes in the correct order:
@Component
@RequiredArgsConstructor
public class ScenarioSetup {

    private final List<ScenarioSetupPart> setupParts;

    @Transactional
    public void setUp(GivenScenario scenario) {
        for (ScenarioSetupPart part : setupParts) {
            part.setUp(scenario);
        }
    }

}
That’s it! When we create a new feature, we just have to create a Configuration and the related Setup class. Afterwards it can be used in any test.
Conclusion
This test setup architecture improved the readability of our tests a lot. Writing new tests or extending scenarios is very easy and the general maintenance effort is lower. If we’re doing a small refactoring, it might be enough to just update the Setup class and leave the actual tests untouched.
However, one downside is that we always have to keep some things in mind when we create new Configuration and Setup classes. For example setting the reference entities or having the correct order of Setup classes. Because the setup happens in the background, the reason for a test failure may not always be obvious.
But if you think further, this system will open up new paths for us. The preparation step is just a matter of configuring an object now. The configuration does not only have to take place in the test. We also created an API endpoint for our Frontend automation tests and in-game cheats. They can now make use of the same system to set up a player without any additional effort. But this is something for the next blog post ![]()