
In this article I want to take you on the journey of how we managed to reduce our mobile client build times from over one hour to about 20 minutes for God Kings.
Fast iteration and turnaround times with testing on real devices are always a concern in mobile game development at InnoGames.
To enable your team to the fullest potential, keeping your build times in check is mandatory. You will need to have as much information on your build process as possible to manage this.
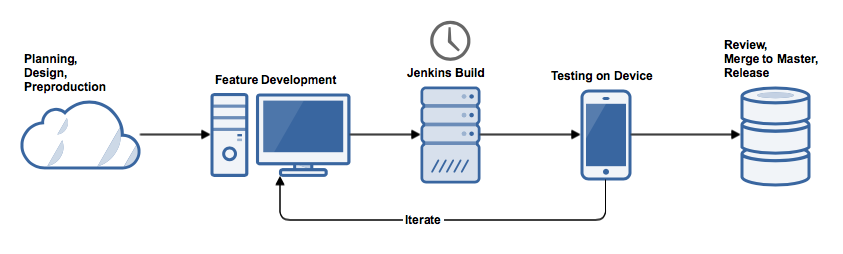
At God Kings our normal development workflow for new features usually consists of working on a feature branch, initial testing in the Unity editor and at least one final test on a real device before the new feature gets merged into our stable master branch. In many cases there are even more than one tests with real mobile devices involved. While testing your game in the Unity editor is quite fast, it doesn’t always cover all the edge cases and a complete build for God Kings took up to 1:20 hours for a final Android release and around 45 minutes for a development build. For fast iterations this is obviously not ideal. Especially if the responsible developers have to switch context and work on something else before they can finally test and demonstrate their work on a device.
God Kings is using Unity 2018.4 LTS together with custom C# build scripts and a Jenkins environment on an Apple Mac Pro node with 2,7 GHz 12-Core Intel Xeon E5 and 64GB memory to build the application during development and for releases. With any stated times in this article, please keep in mind that those times will vary depending on the current system load and used hardware.
Phase 1: Monitor your Builds
The first thing you need to do, before you can really optimize anything is to gather the necessary data. In the case of build time optimization, this means we need to know how much time was spend on every part of the build. We are using Jenkins to enhance our build log files with timestamps.
If you are using another environment to build your application there are similar solutions as well, like for example the ts command line tool from the moreutils collection. With this tool you will be able to add a timestamp or the total runtime to every line of your build log.
echo "This is\na test\nwith multiple\nlines." | ts -s '(%H:%M:%.S)]' | ts '[%Y-%m-%d %H:%M:%S'
[2019-11-22 13:22:16 (00:00:00.000024)] This is
[2019-11-22 13:22:16 (00:00:00.000507)] a test
[2019-11-22 13:22:16 (00:00:00.000531)] with multiple
[2019-11-22 13:22:16 (00:00:00.000545)] lines.
With every solution that enhances a log file with timestamps, please keep in mind that there will most likely be write buffers involved. This means not every line might instantly be written to the output and some lines which originally would have slightly different times could end up with the same timestamp in the enhanced log, because the buffer got flushed with those lines at the same time.
The good thing is we don’t really need micro second precision, since we are more likely interested in tasks that use up several seconds or even minutes!
Phase 2: The big question mark
With the help of proper logging it will be possible to analyze the time each step takes during your builds and take the necessary actions.
I will give you some examples on how we managed to get our build times in check for God Kings. Not all of them will be a 1:1 match for every project, but the underlying ideas can be beneficial in nearly every case.
Step one: Use the right tool for the task at hand
We were wondering why final Android builds took way longer than iOS builds and we quickly came to the conclusion that ETC and ETC2 texture compression was the culprit which took about 30 minutes alone.
Development for God Kings started with Unity in version 5. Since then, there were quite some changes and Unity now uses different tools for ETC compression, depending on compression settings. Coming from an earlier Unity version, for God Kings those settings were using “legacy” mode together with the highest available compression quality for our final builds.

While it can be beneficial to further test compression times with the different tools and different settings to improve those times even further, we already achieved great results by switching to the new default settings in Unity and were able to cut down the build times for texture compressions by nearly 100% and were unable to find any negative impact on visual quality or build size. This dramatic change was quite a shock for us, but it also meant our release and development builds were nearly on par in terms of build time now.
Step two: Only create necessary builds
For Android it is possible to define which processor architectures should be supported with each build when using IL2CPP.
While it is mandatory to distribute 32 and 64 bit versions of your application when distributing your game through the Google Play Store, you don’t necessary need to build for all platforms during development. All current 64 bit ARM Android devices are able to run 32 bit applications. During development this usually means it is sufficient to build the 32 bit version of your game.
In addition Android devices with x86 CPUs are also able to run applications which were build for ARM. This actually works so well, we completely dropped separate x86 builds some time ago and only distribute ARM 32 and 64 bit builds to our players.
When building for Android, it is also possible to include binaries for more than one CPU architecture within one Android APK file. So called FAT builds. This was something we actually did for God Kings with ARM 32 and 64 bit binaries and obviously each binary included in the FAT build will add some time to the compilation. With the above explanation, cutting the 64 bit binary from development builds is an easy win with low risk. Unfortunately it didn’t cut the pure compile times in halve, which we initially hoped. From the estimated speed gain of 4 to 5 minutes we only saw 2 minutes in practice.
Step three: Distribute your workload
The custom God Kings C# build script around the Unity build process started with a “one job does everything” approach in mind and didn’t only build the game, but also performed for example some automated checks.
Over time some of those checks had already been moved into separate Jenkins jobs and were running for example only once per day or for each pull request. This meant there wasn’t a lot of room for improvement here anymore, but we still found checks which weren’t critical for each build.
There was for example one task which was looking for unused fields in the communication layer on the client side. This check took between 30 and 60 seconds and was running during each build. It was originally intended as a tool to help us cleaning up obsolete fields but one does still need to perform the analog check for the server side. This constraint lead us to the decision to move the check from a build step to an “as needed” task.
In general it helps to question which steps are needed for each build on a regular basis and ask which steps can be moved to another task to run with lower frequency.
Step four: Optimize your work order
Since nested Prefabs were only introduced with Unity 2018.3 we were using a mix of Unity Scenes and normal Prefabs to structure the UI of God Kings in a manageable way. At build there are four tasks which have to be done once for each scene.
foreach scene in enabled_scenes {
    load scene
    perform_task_1 on scene
    save scene
}

...

foreach scene in enabled_scenes {
    load scene
    perform_task_4 on scene
    save scene
}
Every task is iterating over all scenes and one by one opens the scene, manipulates the scene and saves it afterwards. The whole process took about 8 to 9 minutes and a big part of the time was used during the save and load operations. By changing the process a bit we were able to reduce the overhead and cut the time by a factor of four.
The new process is still iterating over all scenes per task, but is opening them in additive instead of exclusive mode. After performing all four operations, all scenes get saved in one go, instead of one by one.
foreach scene in enabled_scenes {
    load_additive_or_activate scene
    perform_task_1 on scene
}


...


foreach scene in enabled_scenes {
    load_additive_or_activate scene
    perform_task_4 on scene
}

save_all_scenes
This reduced a process that took 8 to 9 minutes to about 2 minutes. This was another huge gain for us and once again shows that optimizing your overall algorithm usually trumps any micro optimizations.
Step five: Only use what you actually need
After optimizing many of our custom tools and processes, we also took a look at what happens after we call Unitys “BuildPipeline.BuildPlayer(..)“. For IL2CPP, builds which we are using for iOS and Android, we saw the compilation and linking of some DLLs which didn’t seem to be necessary for our game.
[2019-10-22T16:22:05.164Z] - Starting compile Library/ScriptAssemblies/Unity.TextMeshPro.dll
[2019-10-22T16:22:05.164Z] - Starting compile Library/ScriptAssemblies/Unity.PackageManagerUI.Editor.dll
[2019-10-22T16:22:05.164Z] - Starting compile Library/ScriptAssemblies/UnityEditor.StandardEvents.dll
...
[2019-10-22T16:22:20.965Z] -r:'/Applications/Unity_2018.4.12f1/Unity.app/Contents/Managed/UnityEngine/UnityEngine.AIModule.dll'
[2019-10-22T16:22:20.965Z] -r:'/Applications/Unity_2018.4.12f1/Unity.app/Contents/Managed/UnityEngine/UnityEngine.ARModule.dll'
[2019-10-22T16:22:20.965Z] -r:'/Applications/Unity_2018.4.12f1/Unity.app/Contents/Managed/UnityEngine/UnityEngine.ClothModule.dll'
[2019-10-22T16:22:20.965Z] -r:'/Applications/Unity_2018.4.12f1/Unity.app/Contents/Managed/UnityEngine/UnityEngine.CloudWebServicesModule.dll'
[2019-10-22T16:22:20.965Z] -r:'/Applications/Unity_2018.4.12f1/Unity.app/Contents/Managed/UnityEngine/UnityEngine.DirectorModule.dll'
[2019-10-22T16:22:20.965Z] -r:'/Applications/Unity_2018.4.12f1/Unity.app/Contents/Managed/UnityEngine/UnityEngine.FacebookModule.dll'
[2019-10-22T16:22:20.965Z] -r:'/Applications/Unity_2018.4.12f1/Unity.app/Contents/Managed/UnityEngine/UnityEngine.GameCenterModule.dll'
[2019-10-22T16:22:20.965Z] -r:'/Applications/Unity_2018.4.12f1/Unity.app/Contents/Managed/UnityEngine/UnityEngine.GridModule.dll'
[2019-10-22T16:22:20.965Z] -r:'/Applications/Unity_2018.4.12f1/Unity.app/Contents/Managed/UnityEngine/UnityEngine.ImageConversionModule.dll'
[2019-10-22T16:22:20.965Z] -r:'/Applications/Unity_2018.4.12f1/Unity.app/Contents/Managed/UnityEngine/UnityEngine.LocalizationModule.dll'
[2019-10-22T16:22:20.965Z] -r:'/Applications/Unity_2018.4.12f1/Unity.app/Contents/Managed/UnityEngine/UnityEngine.ScreenCaptureModule.dll'
[2019-10-22T16:22:20.965Z] -r:'/Applications/Unity_2018.4.12f1/Unity.app/Contents/Managed/UnityEngine/UnityEngine.SpatialTrackingModule.dll'
[2019-10-22T16:22:20.965Z] -r:'/Applications/Unity_2018.4.12f1/Unity.app/Contents/Managed/UnityEngine/UnityEngine.TerrainModule.dll'
[2019-10-22T16:22:20.965Z] -r:'/Applications/Unity_2018.4.12f1/Unity.app/Contents/Managed/UnityEngine/UnityEngine.TerrainPhysicsModule.dll'
[2019-10-22T16:22:20.965Z] -r:'/Applications/Unity_2018.4.12f1/Unity.app/Contents/Managed/UnityEngine/UnityEngine.TilemapModule.dll'
[2019-10-22T16:22:20.965Z] -r:'/Applications/Unity_2018.4.12f1/Unity.app/Contents/Managed/UnityEngine/UnityEngine.TimelineModule.dll'
[2019-10-22T16:22:20.965Z] -r:'/Applications/Unity_2018.4.12f1/Unity.app/Contents/Managed/UnityEngine/UnityEngine.UIElementsModule.dll'
[2019-10-22T16:22:20.965Z] -r:'/Applications/Unity_2018.4.12f1/Unity.app/Contents/Managed/UnityEngine/UnityEngine.UNETModule.dll'
[2019-10-22T16:22:20.965Z] -r:'/Applications/Unity_2018.4.12f1/Unity.app/Contents/Managed/UnityEngine/UnityEngine.UmbraModule.dll'
[2019-10-22T16:22:20.966Z] -r:'/Applications/Unity_2018.4.12f1/Unity.app/Contents/Managed/UnityEngine/UnityEngine.UnityAnalyticsModule.dll'
[2019-10-22T16:22:20.966Z] -r:'/Applications/Unity_2018.4.12f1/Unity.app/Contents/Managed/UnityEngine/UnityEngine.UnityConnectModule.dll'
[2019-10-22T16:22:20.966Z] -r:'/Applications/Unity_2018.4.12f1/Unity.app/Contents/Managed/UnityEngine/UnityEngine.VRModule.dll'
[2019-10-22T16:22:20.966Z] -r:'/Applications/Unity_2018.4.12f1/Unity.app/Contents/Managed/UnityEngine/UnityEngine.VehiclesModule.dll'
[2019-10-22T16:22:20.966Z] -r:'/Applications/Unity_2018.4.12f1/Unity.app/Contents/Managed/UnityEngine/UnityEngine.VideoModule.dll'
[2019-10-22T16:22:20.966Z] -r:'/Applications/Unity_2018.4.12f1/Unity.app/Contents/Managed/UnityEngine/UnityEngine.WindModule.dll'
[2019-10-22T16:22:20.966Z] -r:'/Applications/Unity_2018.4.12f1/Unity.app/Contents/Managed/UnityEngine/UnityEngine.XRModule.dll'
We quickly realized those DLLs correspond to the default selection of builtin Unity modules which were introduced with the modular package management system in Unity 2017.2.
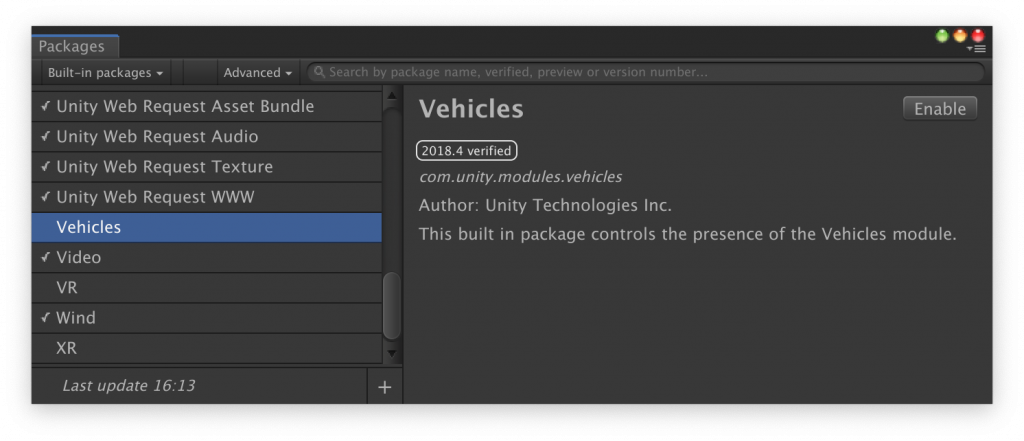
Unity did extend this feature since its release and introduced the Package Manager UI in 2018.1. You can find it in the Unity menu under “Window -> Package Manager”. Within the UI you can easily enable and disable Unity built packages as needed and even install new packages. Within the Package Manager UI it is possible to see all installed and used packages with their version.
Since the introduction of modules in Unity it is not only possible to add additional packages, but also to tailor the builtin modules exactly as needed to the project you are working on. The default set of modules is useful for a wide array of projects, but also contains some rather specialized packages like VR/AR support, Unity payment and the Unity Ads module. With disabling unnecessary modules, we were actually able to reduce the build times further. This actually reduced the build time slightly by 40 to 80 seconds. While this isn’t a huge gain, there is another benefit we initially didn’t intend or expected to see. Removing unnecessary modules also had an unexpected huge impact on the size of the resulting binary of ~1.5 MB. Since it seemed unlikely that this was the impact of just additional code, we analyzed the difference in the resulting Android apk file.
The content of added packages doesn’t show up in the project view but some of them still add additional assets behind the scenes besides just code. Those assets can be easy to overlook. The Unity Ads package for example adds two rather large images with a size of 1024×2048 and 2048×1024 pixels respectively.

Those textures explain the difference in size of the build and are not under your control when using the Unity Ads package.
Always be mindful of the impact of any added package or dependency for your project!
Phase 3: Profit!
To keep your turnaround times in a healthy state, keep an eye on your build times. Try to move unnecessary and shareable steps like asset importing and building out of each single build to a task which can be done less frequent.
The above steps might not help in every situation and for every project, but they illustrate that the sum of a few small steps can have a huge impact. In our case we successfully reduced the build times quite significantly with the steps outlined above. But every project is different and your milage might vary.


For projects with a longer development history and Unity projects which upgrade to another version, it is also helpful to check for new settings and options. Some improvements of a newer Unity version might not be enabled by default for an upgraded project. This makes sense in order to keep the behavior between two versions the same, but it might not always be the best setting for your project. Sometimes it might be an improved API, sometimes some new tooling, you never know.