Introduction
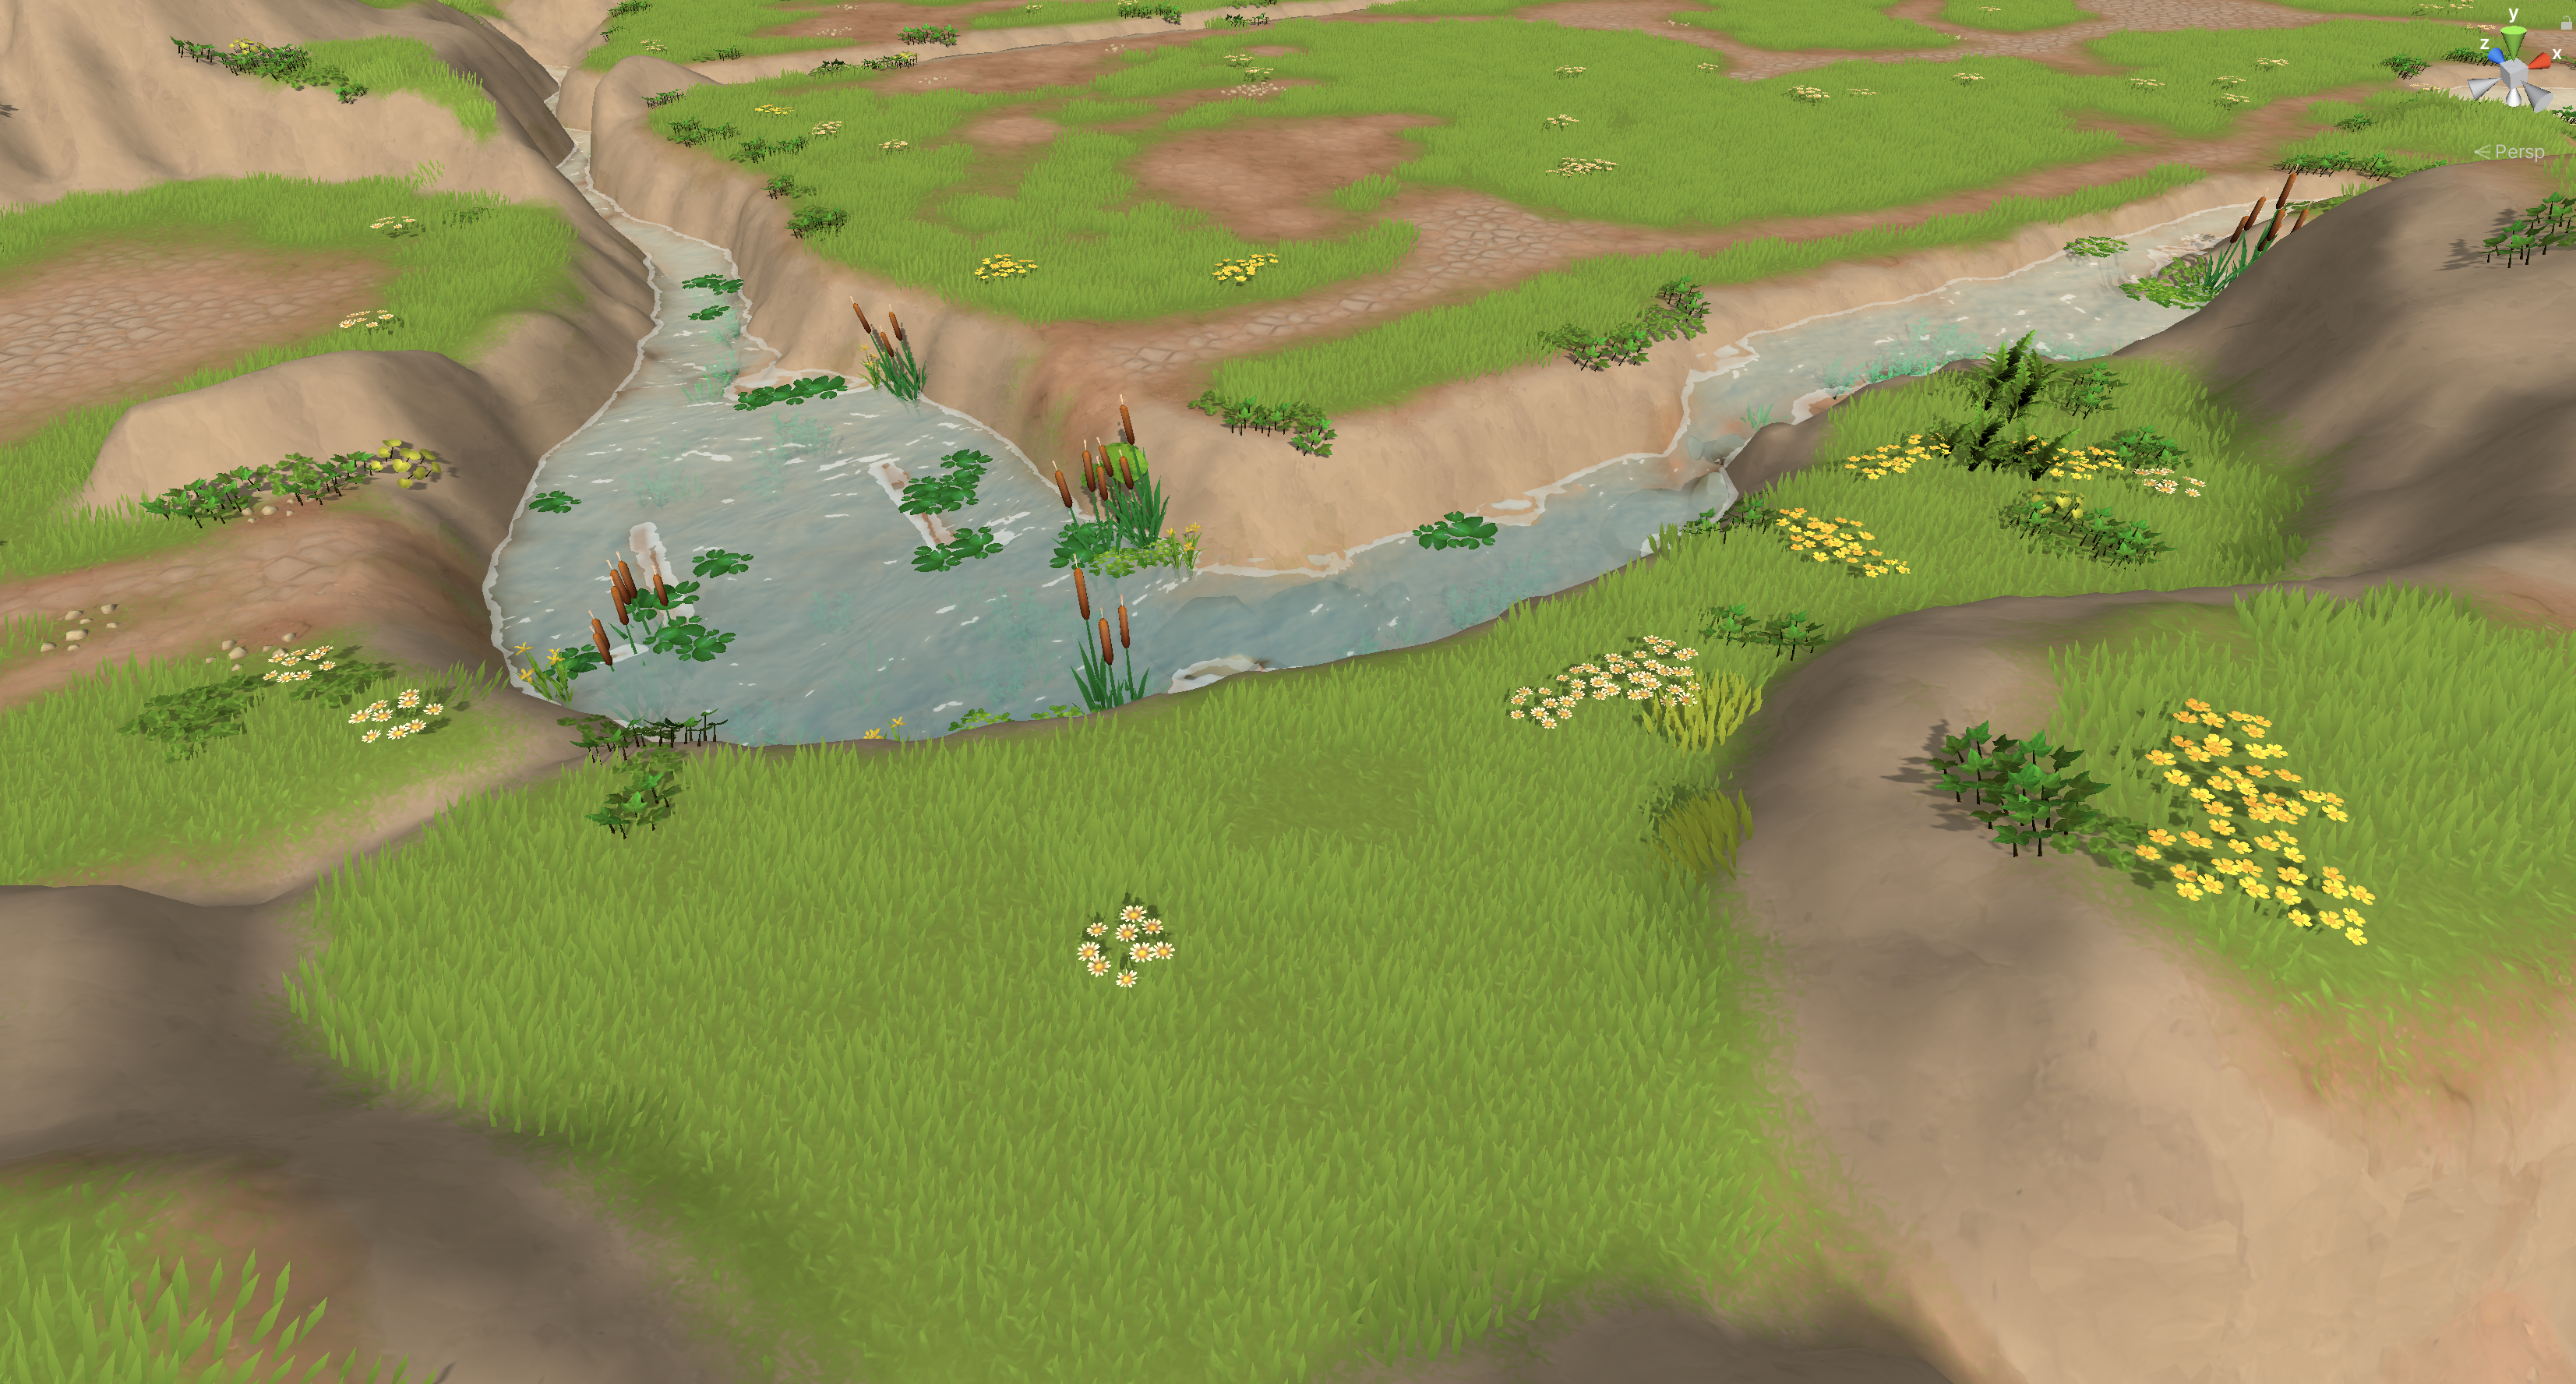
In Sunrise Village you can explore a beautiful world full of lush vegetation. The ground and many objects are covered with grass, flowers, ferns and water plants. We call this kind of ground foliage “MicroVegetation“. MicroVegetation is not just static: When you chop down a tree grass regrows at the new empty spot and when you build a house the vegetation is removed from the building’s footprint area. We created a custom system to render and edit MicroVegetation system.
This is a series of three articles describing why and how we did this. The first article is about rendering vegetation. The second one explains how we can modify terrain at runtime. And the third post will deal with painting vegetation in the Unity Editor.
Requirements
Unity already comes with a solid terrain system that works on mobile and supports covering the surface with grass and detail objects. So why would you create a custom vegetation system? For Sunrise Village we had the following requirements for vegetation:
| Requirement | Supported by Unity Terrain Grass/Details |
|---|---|
| Cover ground with grass and flowers | Yes |
| Run smoothly on mobile, even on older devices | Yes, if vegetation does not overlap too much |
| Grow on mesh (non-terrain) ground | No |
| Modify at runtime (hide below buildings and restore vegetation when objects have been collected) | Not out of the box |
| Artist friendly vegetation editor | Yes |
So there were some requirements that could not be done with the Unity terrain system, like runtime modifications and rendering on meshes. Another reason for us to write a custom system was to have full control over features and optimisation.
Vegetation Grid
One important aspect of our MicroVegetation system was to have optimal ground coverage with as little overdraw as possible. So we started creating some low poly vegetation objects of 1m diameter. Since Sunrise Village has a fixed camera direction vegetation objects are optimised for this direction.
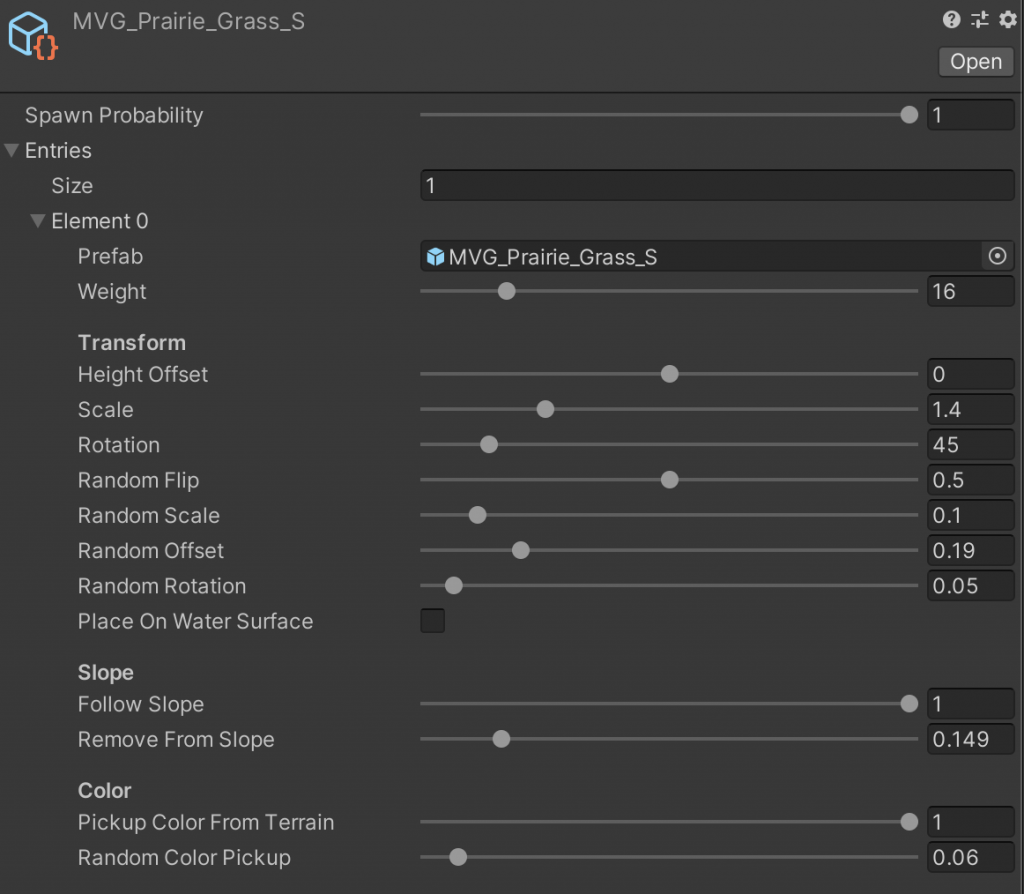
These objects are laid out in a hex grid. To break up the grid each object could get some random values such as offset, rotation and color. These parameters are defined in configuration assets (MicroVegetationPreset) that can be tweaked by artists.
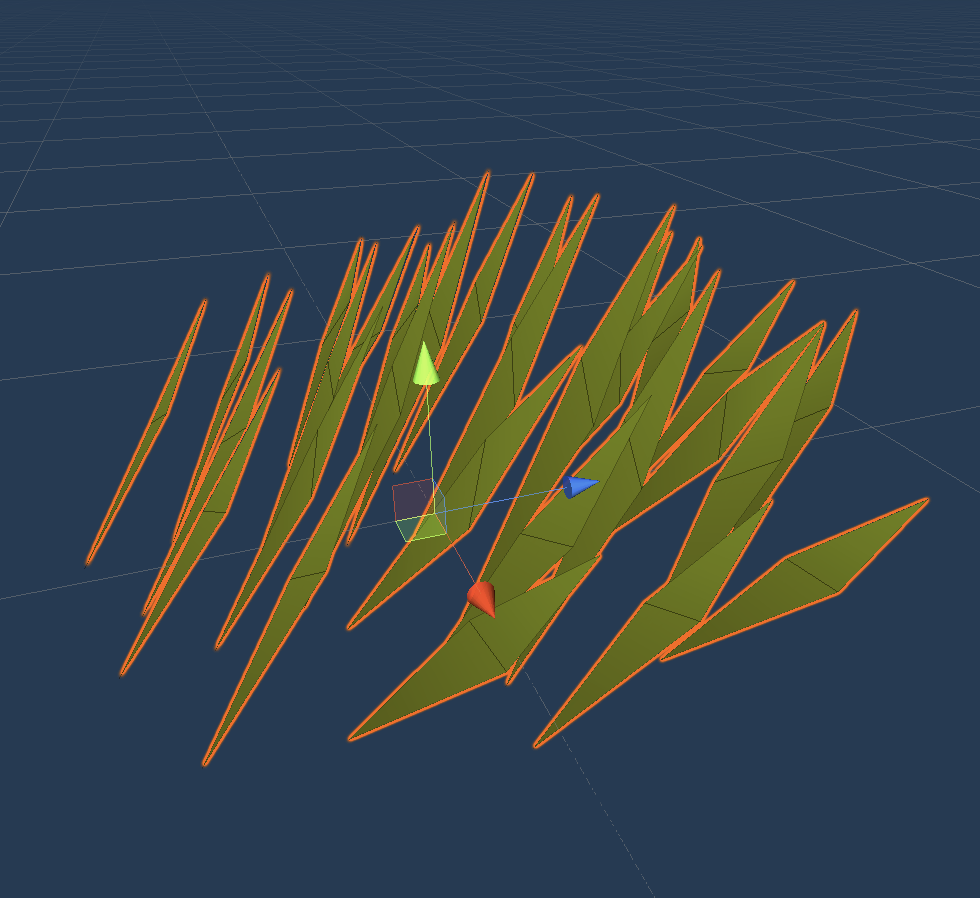
Low poly vegetation object 
Hex grid layout 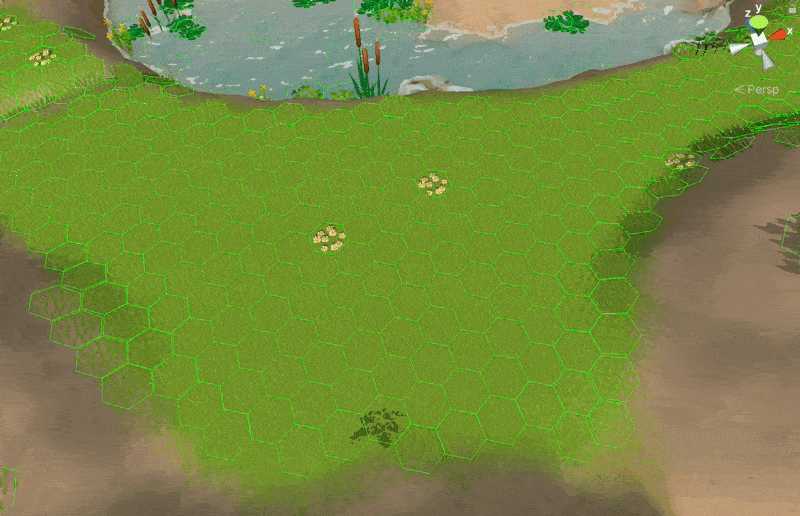
Breaking up the grid
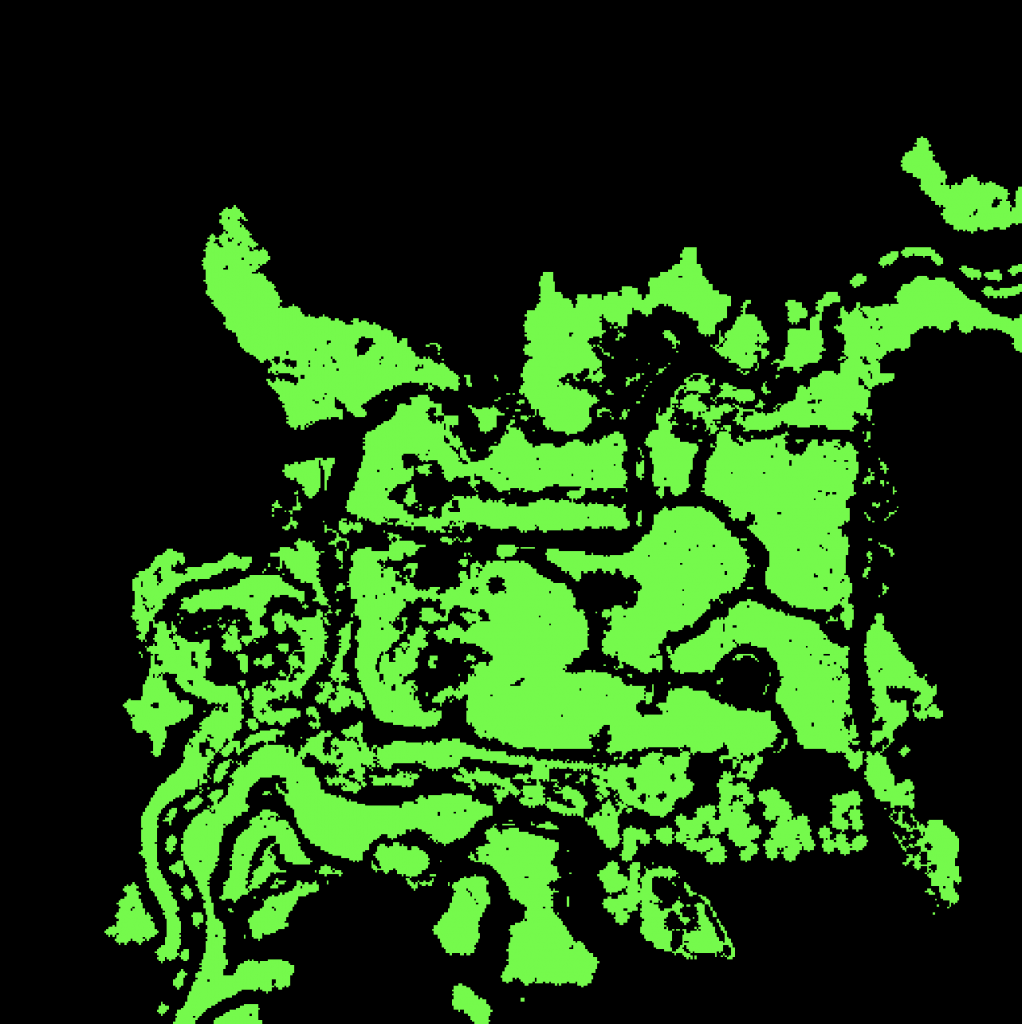
Splat Map
The information which vegetation grows on a spot is stored in a bitmap – the splat map. In Sunrise Village the splat map is just an array of bytes. The splat map is projected top down on the terrain (or mesh) and the layout system generates meshes from this information. Each pixel of the splat map can have a value from 0 to 255. 0 means no vegetation, so the vegetation can have 255 different types of vegetation which is more than enough for our project.
MicroVegetationPresets
Each value of the splat map maps to an entry in a MicroVegetationSet which is a list of MicroVegetationPresets. So if an artist paints a value with 1 into the splat map the vegetation prefab and layout information of the first MicroVegetationPreset would be used.
To make MicroVegetation painting faster and more comfortable a preset can have more than one entry. Each entry has a weight and an entry is chosen by random in the layout process. This means artists can paint a complete meadow with different kinds of vegetation with a single stroke! Also the combination of the vegetation objects on the meadow can be modified later by tweaking the preset.
MicroVegetationRenderer
Rendering of MicroVegetation is done by the MicroVegetationRenderer component. It works both at runtime and in the editor. In the editor the user can also use the Inspector of this component to paint vegetation.
At its core MicroVegetationRenderer calls Graphics.DrawMeshInstanced for every mesh on the terrain. Using GPU instancing here is also the key to high performance.
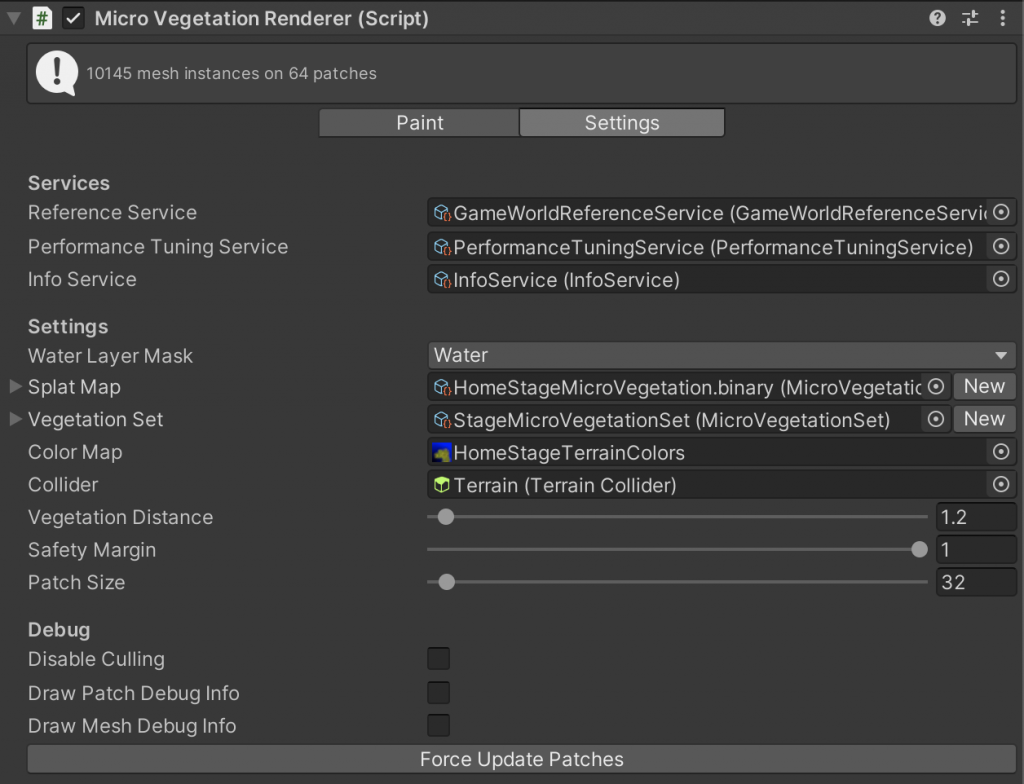
The collider field in the component is the link between the MicroVegetation and the object it is growing on. It can be a TerrainCollider or any other collider like a MeshCollider. In the layout process the bounds of the collider define the area where vegetation can grow.
For each vegetation element a ray cast from above is performed so the vegetation is placed on the ground. When a TerrainCollider is specified ray casts can be avoided instead the height of the terrain at the position of each vegetation element is used.
Drawing Meshes
This is the rendering part of MicroVegetationRenderer. We hook into Camera.onPreCull which it called for every camera before it performs any culling.
private void OnEnable()
{
    ...
    Camera.onPreCull += DrawMeshes;
}

private void OnDisable()
{
    Camera.onPreCull -= DrawMeshes;
}

public void DrawMeshes(Camera currentCamera)
{
    ...
    UpdateVisibleModifiedPatchesNow();

    bool cull = isPlaying && !DisableCulling;
    foreach (var patch in _patches)
    {
        if (cull && !IsPatchVisible(patch))
        {
            continue;
        }
        patch.DrawMeshes(gameObject.layer, castShadows, currentCamera);
    }
    ...
}
You see that the renderer does not draw the meshes directly but loops through a list of patches. This is is how a MicroVegetationPatch draws the meshes:
public void DrawMeshes(int layer, bool castShadows, Camera camera)
{
    foreach (var batch in _batches)
    {
        if (batch.Matrices.Count == 0)
        {
            continue;
        }

        Graphics.DrawMeshInstanced(
            batch.Mesh, 0, batch.Material, batch.Matrices,
            batch.MaterialPropertyBlock,
            batch ? batch.ShadowCastingMode : ShadowCastingMode.Off,
            batch.ReceiveShadows, layer, camera);
    }
}
Patches
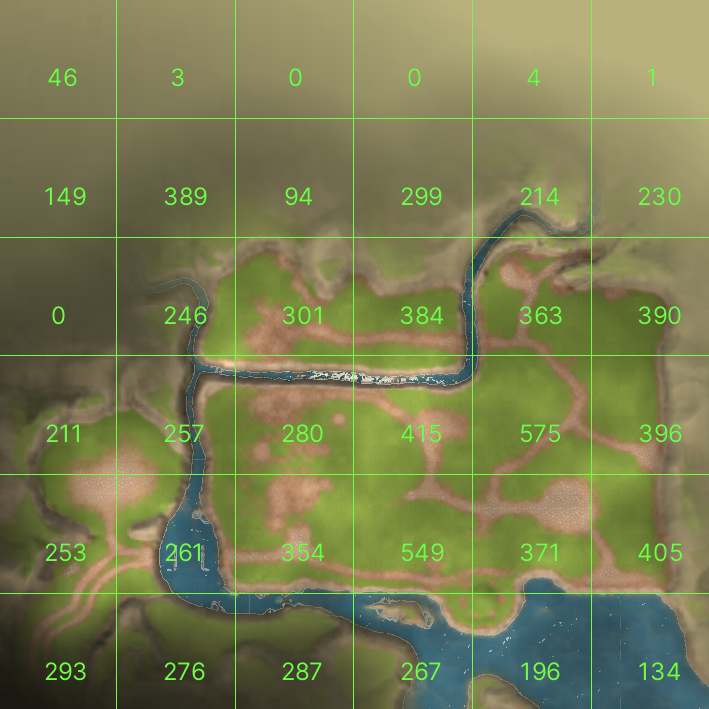
Graphics.DrawMeshInstanced can draw 1023 meshes at once. That means we cannot cull individual meshes when they are now visible to the camera but only a batch of meshes which is drawn at once. Therefore MicroVegetation is split into rectangular patches (similar to the Unity terrain). When drawing a visibility check for each patch is performed and invisible patches are skipped.
private bool IsPatchVisible(MicroVegetationPatch patch)
{
    return GeometryUtility.TestPlanesAABB(_planes, patch.Bounds);
}
This is the vegetation on Terrain. A single MicroVegetationRenderer is used. In this case the vegetation is split into 64 patches. The size of a patch and therefore the number of vegetation mesh instances can be tweaked to optimise the number of draw calls.
Updating the patches
You see in MicroVegetationPatch.DrawMeshes() we loop through all the meshes of a patch and draw all instances of this mesh. But before the meshes can be rendered we need to create the lists of meshes and matrices based on the splat map. This happens in UpdatePatch() just before rendering when the splat map has changed or when the vegetation is rendered for the first time.
In UpdatePatch() we do loop through all possible positions on the hex grid of a patch, check the splat map and apply some random variation. The resulted information of prefab, color and transformation is then passed to AddVegetationObject() which adds it to the list of batches. Updating patches can be an expensive operation therefore it is only performed when the area of the splat map which contains the patch has been changed and if it is visible to the camera.
public void UpdatePatch(...)
{
    ...

    Vector2 hexSize = new Vector2(vegetationDistance, vegetationDistance * 2 / Mathf.Sqrt(3));
    var oddRow = false;
    var bounds = collider.bounds;

    float rectXMin = Rect.xMin;
    float rectXMax = Rect.xMax;
    float rectYMin = Rect.yMin;
    float rectYMax = Rect.yMax;
    int splatMapWidth = splatMap.Width;
    int splatMapHeight = splatMap.Height;
    float worldToSplatX = splatMapWidth / bounds.size.x;
    float worldToSplatY = splatMapHeight / bounds.size.z;

    // Rebuild the Vegetation from the maps:
    for (float z = rectYMin; z < rectYMax; z += hexSize.y * 0.75f)
    {
        for (float x = rectXMin; x < rectXMax; x += hexSize.x)
        {
            var hexPos = new Vector2(x, z);
            if (oddRow)
            {
                hexPos.x += hexSize.x * 0.5f;
            }

            var splatMapX = (int)( hexPos.x * worldToSplatX );
            var splatMapY = (int)( hexPos.y * worldToSplatY );

            if (splatMapX < 0 || splatMapX > splatMapWidth - 1 ||
                splatMapY < 0 || splatMapY > splatMapHeight - 1)
            {
                continue;
            }

            int layer = splatMap.Get(splatMapX, splatMapY);

            ...

            var pos = new Vector3(hexPos.x, 0, hexPos.y);

            // Make sure we get the same random numbers every time if the position stays the same.
            // We multiply the position by large numbers to make sure we get different results for
            // neighbouring positions and no noticeable repetition:
            Random.InitState((int)( pos.x * 9999f + pos.z * 8888f ));
            if (Random.value > preset.SpawnProbability)
            {
                continue;
            }

            var entry = MicroVegetationUtils.PickRandomEntry(preset.Entries);

            // Add random offset:
            pos.x += entry.RandomOffset * Random.Range(-vegetationDistance, vegetationDistance);
            pos.z += entry.RandomOffset * Random.Range(-vegetationDistance, vegetationDistance);

            var normalizedCoordinatesWithOffset = new Vector2(pos.x / bounds.size.x, pos.z / bounds.size.z);
            Vector3 scale = Vector3.one * (Random.Range(1f - entry.RandomScale, 1f + entry.RandomScale) * entry.Scale);

            ...

            var normal = upVector;
            if (usingTerrain)
            {
                // Avoid expensive ray casts if possible:
                float height = terrainData.GetInterpolatedHeight(normalizedCoordinatesWithOffset.x, normalizedCoordinatesWithOffset.y);
                pos.y = terrainYPosition + height;
                normal = terrainData.GetInterpolatedNormal(normalizedCoordinatesWithOffset.x, normalizedCoordinatesWithOffset.y);
            }

            ...

            normal = Vector3.Lerp(upVector, normal, entry.FollowSlope);

            pos += normal * entry.HeightOffset;

            var rotation = Quaternion.FromToRotation(Vector3.up, normal);
            rotation *= Quaternion.AngleAxis(entry.Rotation, Vector3.up);

            // Add random variation:
            rotation *= Quaternion.Euler(0, 180f * Random.Range(-entry.RandomRotation, entry.RandomRotation), 0);

            var color = colorMap != null ? Color.Lerp(Color.gray,
                colorMap.GetPixelBilinear(normalizedCoordinatesWithOffset.x, normalizedCoordinatesWithOffset.y),
                entry.PickupColorFromTerrain * ( 1f - Random.Range(0f, entry.RandomColorPickup) )) : Color.gray;

            AddVegetationElement(entry.Prefab, pos, rotation.eulerAngles, scale, color);
        }
        oddRow = !oddRow;
    }
}
Wrap Up
Creating a custom vegetation renderer is not a trivial task. In most cases you don’t need a custom vegetation solution because Unity already supports rendering vegetation on Terrain. Also there are other vegetation systems you can get from the Unity Store.
But if you need full control over layout, rendering and optimisation it may be worth spending some time to write your custom vegetation system. What we haven’t covered here it to make use of the Scriptable Render Pipeline. When we started with our MicroVegetation system the Scriptable Render Pipeline was not ready yet and also we are not using it in Sunrise Village. But using the SRP it may be possible to render vegetation in a more flexible way e.g. create meshes on the fly from the information in the splat map.
Follow Up Topics
- MicroVegetationView – Update vegetation at runtime
- MicroVegetationEditor – Painting Vegetation
InnoGames is hiring! Check out open positions and join our awesome international team in Hamburg at the certified Great Place to Work®.